Setting Up a Haskell Project on NixOS

This entry is part 6 of 6 in the series Setting Up Haskell Development on NixOS Linux from Scratch

Previously, we looked at how to add new packages to our nixpkgs expression tree. Often, the reason we are adding new packages is that we want to use them for Haskell development! This installment will explore starting a new Haskell project.

Again, we’re going to be using some custom nix commands that we set up in previous posts of this series, so if you’re jumping in here, you might want to back up a few installments if you find yourself getting lost.

I’m going to be using the janrain snap tutorial as the basis for this installment, but much of this exploration is getting set up to do the tutorial, so there is not much overlap.

Set Up Project Files

First, let’s set up the basic project files we’re going to be using for our exploration.

Basic Snap Setup

Run the following commands to set up a new projectomatic directory and initialize it using cabal init and snap init. For the cabal init call, you can accept all the defaults if you want; most of the files generated with that call will be overwritten by snap init anyway. When asked, you want to choose 2) Executable.

#!bash
mkdir projectomatic
cd projectomatic
cabal init
snap init

If you encounter a snap: command not found message, then you need to install snap into your user environment. If you already have the package, installing it will just make it active for the user environment so you can call snap init. Otherwise, installing will both build it and make it active.

#!bash
nix-install haskellPackages.snap

The project directory will be initialized with a projectomatic.cabal file, among others. Feel free to modify the values set by default in the cabal file. I’m going to leave the defaults as is for this tutorial.

Sanity Check: In your projectomatic directory, you should now have projectomatic.cabal, Setup.hs, and the directories log, snaplets, src, and static.

Generate default.nix

Just like we used the cabal2nix utility to automatically generate nix expression for hackage packages, we can also use cabal2nix to generate expressions for our new projectomatic project.

#!bash
cabal2nix projectomatic.cabal --sha256 blah > default.nix

Check out the new default.nix and you’ll see a nice, clean expression for the new projectomatic package. We want to change the sha256 = "blah" to src = ./., but other than that, the expression is similar to the ones we saw previously.

We can’t run it just yet, though. This expression is generated so that it can be integrated into the haskellPackages environment of nixpkgs. Since our project will be distinct from haskellPackages, we need to do some additional customization.

The first issue is with the expression inputs:

#!nix
{ cabal, heist, lens, MonadCatchIOTransformers, mtl, snap, snapCore
, snapLoaderStatic, snapServer, text, time, xmlhtml
}:

This looks just like the previous nix expressions we encountered, so what’s the problem? When we incorporated new nix expressions into the nixpkgs expression tree, expressions for dependent Haskell packages were defined in the same haskellPackages scope. Thus, when Nix needed the input cabal expression in order to put the cabal dependency on the path, it could do it because the cabal expression was in the same scope.

On the other hand, here we are defining a nix expression outside of that scope, so Nix doesn’t know what the cabal dependency means. In fact, if we try to run nix-build for projectomatic, we’ll see this:

#!bash
[dan@nixos:~/Code/projectomatic]$ nix-build
error: cannot auto-call a function that has an argument without a default value (`cabal')

To fix this problem, we need to specify in our default.nix expression where the dependent expressions are defined. We’ll do this by redefining the expression to take a single haskellPackages input argument that has a default value defined as (import <nixpkgs> {}).haskellPackages), which is the scope we want!

#!nix
{ haskellPackages ? (import <nixpkgs> {}).haskellPackages }:
let 
  inherit (haskellPackages) cabal heist lens MonadCatchIOTransformers mtl snap snapCore
  snapLoaderStatic snapServer text teim xmlhtml
  ;

in cabal.mkDerivation (self: {

The term <nixpkgs> instructs Nix to look for expressions beginning with $NIX_PATH/nixpkgs. Since my NIX_PATH has only the prefix that I set in my .bashrc file, the resolved file path is my desired local directory /home/dan/Code/nixpkgs.

#!bash
[dan@nixos:~/Code/projectomatic]$ echo $NIX_PATH
/home/dan/Code:nixos-config=/etc/nixos/configuration.nix

Using nix-shell

Now we have all the files we need for a complete (but minimal) snap default project. A lot of our effort was spent tweaking the new default.nix to work with our new project. Surely there must be some way to check that it’s correct.

A Quick Reminder about Expressions

Remember the purpose of nix expressions.

  1. Define all system inputs to a package
  2. Define the build steps for the package

When a nix expression is run, Nix configures something of a private system for building the package. The private system is configured to only have the dependencies of the nix expression. If a required dependency is left out of the expression inputs, the package will fail to build.

nix-shell Command

The nix-shell command acts as a way to inject a CLI into this private system. Within the nix-shell, the user can build expressions and run commands as if they are being run as part of an expression. Let’s try it out

#!bash
[dan@nixos:~/Code/projectomatic]$ nix-shell
error: Package ‘projectomatic-0.1’ in ‘/home/dan/Code/projectomatic/default.nix:18’ has an unfree license, refusing to evaluate. You can set
  { nixpkgs.config.allowUnfree = true; }
in configuration.nix to override this. If you use Nix standalone, you can add
  { allowUnfree = true; }
to ~/.nixpkgs/config.nix.

Whoa, what happened here? By default, Nix won’t evaluate expressions that have an unfree license, which, if you accepted all the defaults like I did, is what we have for our project. By following the instructions given in the error, we can allow unfree packages to be built. However, this will allow unfree packages everywhere, and we just want to build this one unfree package.

An unmentioned way to enable unfree packages is the NIXPKGS_ALLOW_UNFREE environment variable. We can temporarily enable unfree packages, build the one we want, and then disable it again to return us back to our starting point. I added this to my .bashrc file (along with nix-install and nix-search) to make it easy to drop into an unfree nix-shell.

#!bash
nix-shell-unfree() {
  FLAGSAVE=$NIXPKGS_ALLOW_UNFREE;
  echo "Opening shell with NIXPKGS_ALLOW_UNFREE=1. Original setting of $FLAGSAVE will restored on exit.";
  export NIXPKGS_ALLOW_UNFREE=1;
  nix-shell;
  echo "Restoring NIXPKGS_ALLOW_UNFREE=$FLAGSAVE ...";
  export NIXPKGS_ALLOW_UNFREE=$FLAGSAVE;
}

Now our nix-shell-unfree command will put us in a nix shell.

#!bash
[dan@nixos:~/Code/projectomatic]$ nix-shell-unfree
Opening shell with NIXPKGS_ALLOW_UNFREE=1.  Original setting of 0 will restored on exit

[nix-shell:~/Code/projectomatic]$ exit
exit
Restoring NIXPKGS_ALLOW_UNFREE=0 ...

Try entering a nix-shell-unfree and running nix-build. Did the build work without error? Depending on your dependency versions, maybe it did. For me, I get the following:

#!bash
Setup: At least the following dependencies are missing:
lens >=3.7.6 && <4.2

Looks like I still have some work to do. At first, I started setting up a new local expression for a different lens version, but after getting it set up, I found that snap requires lens 4.2, even though the cabal file written by by snap init requires less than 4.2! I am chalking this up to a bug and manually edited the projectomatic.cabal file to use lens <= 4.2. After that, nix-build works without issue. Note that I also tried keeping the cabal file unmodified and using jailbreak=true, but that had no effect as far as I could tell.

Running the Default Application

We have successfully overcome several obstacles in getting the default, (mostly) unmodified snap project template to compile. Now let’s run it.

When using nix-build, Nix puts a sym link into your project directory called result that points to the location in the store that holds the build results of the expression. We can use result to get easy access to our new binary.

snap-app


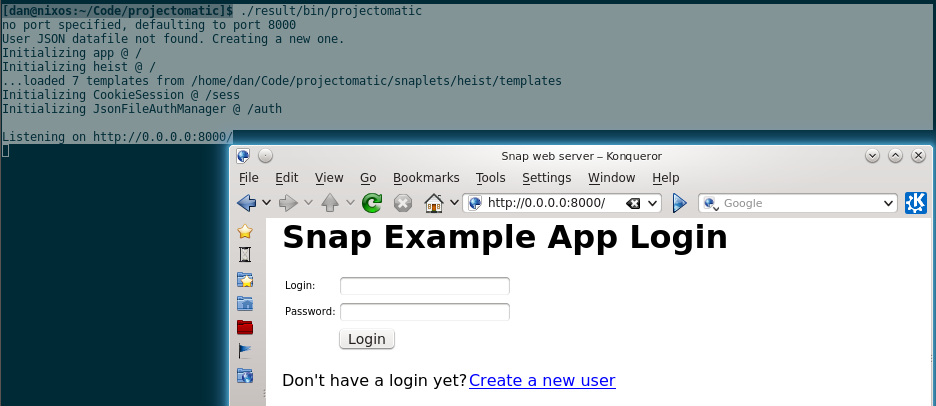
TADA! We are now ready to actually follow the janrain tutorial. This installment is long enough already, so I’ll save exploring the tutorial itself for next time.

Adding Nix Expressions for New Packages

This entry is part 5 of 6 in the series Setting Up Haskell Development on NixOS Linux from Scratch

The nixpkgs repository does a good job of including many Haskell packages already. Indeed, it almost seems like the lazy, functional Nix-based NixOS might have a soft spot for Haskell :). Much of hackage is available with just a few keystrokes, relieving cabal of its package-managing tasks.

However, nixpkgs does not include all of hackage, and it’s actually not hard run into missing packages during development. For instance, not long ago I wanted to build a toy snap app as a first project in NixOS. While snap is available, snap-web-routes is not.

We’ll explore adding hackage packages to your local nixpkgs repo (and submitting them upstream) in this installment. In fact, we’re going to add snap-web-routes to nixpkgs.

Preparing git

If you followed my earlier installment in this series, you should have a local clone of the nixpkgs repository. Since we plan to submit a pull request with our changes, we need to take a few steps to prepare git. If you are pretty seasoned with git, you can probably skip this section.

Add and Sync Upstream

We need to add the primary NixOS/nixpkgs github repository to our remotes. This will enable us to pull in updates to the nix expressions easily.

#!bash
git remote add upstream https://github.com/NixOS/nixpkgs.git
git fetch upstream
git merge upstream/master

The last two lines are what we’ll execute whenever we want to pull in updates for our custom nix-search and nix-install calls.

Make a New Branch

Next we need to create a new branch for adding our new expression. This will isolate our updates when we submit a pull request; otherwise, any additional, unrelated updates we make to our local repository and push to origin will get added to the pull request! I learned this the hard way.

Make a new branch and check it out using checkout and -b.

#!bash
git checkout -b add-haskell-snap-web-routes

Adding Expressions

Nixpkgs Expression Hierarchy

The nix expressions for all the available package are included in our local nixpkgs repository. Each nix expression is specified using a path. If no file name is provided in the path, then the file name of default.nix is assumed. For example, nixpkgs/ has a default.nix, which has the following line

#!nix
import ./pkgs/top-level-all-packages.nix

The default.nix expression imports all the expressions listed in pkgs/top-level/all-packages.nix. This expression, in turn, imports expressions from other locations in the nixpkgs repository. The one we are interested in is pkgs/top-level/haskell-packages.nix. Here’s just one excerpt from the haskell-packages.nix file.

#!nix
snap = callPackage ../development/libraries/haskell/snap/snap.nix{}

So, when we invoke nix-install haskellPackages.snap, Nix calls the expression located at in the ../development/libraries/haskell/snap/snap.nix file. Thus, to add a new packages to our repo, we need to

  1. Write a nix expression file and put it in a logical spot in the nixpkgs repository.
  2. Put a line in haskell-packages.nix we can use to call the expression file.

A Nix Expression for a Cabal Package

To add snap-web-routes to the hierarchy, we need to write a nix expression for it. What does a nix expression look like? Here’s the one for snap given in the nix file mentioned above.

#!nix
{ cabal, aeson, attoparsec, cereal, clientsession, comonad
, configurator, directoryTree, dlist, errors, filepath, hashable
, heist, lens, logict, MonadCatchIOTransformers, mtl, mwcRandom
, pwstoreFast, regexPosix, snapCore, snapServer, stm, syb, text
, time, transformers, unorderedContainers, vector, vectorAlgorithms
, xmlhtml
}:

cabal.mkDerivation (self: {
  pname = "snap";
  version = "0.13.2.7";
  sha256 = "1vw8c48rb1clahm1yw951si9dv9mk0gfldxvk3jd7rvsfzg97s4z";
  isLibrary = true;
  isExecutable = true;
  buildDepends = [
    aeson attoparsec cereal clientsession comonad configurator
    directoryTree dlist errors filepath hashable heist lens logict
    MonadCatchIOTransformers mtl mwcRandom pwstoreFast regexPosix
    snapCore snapServer stm syb text time transformers
    unorderedContainers vector vectorAlgorithms xmlhtml
  ];
  jailbreak = true;
  patchPhase = ''
    sed -i -e 's|lens .*< 4.2|lens|' snap.cabal
  '';
  meta = {
    homepage = "https://snapframework.com/";
    description = "Top-level package for the Snap Web Framework";
    license = self.stdenv.lib.licenses.bsd3;
    platforms = self.ghc.meta.platforms;
  };
})

Whoa, that’s a lot to take in. Let’s go through the main points.

Dependencies List

The big list at the top are the dependencies for the nix expression. When Nix runs this expression, it first ensure that all dependencies are available and placed on the path. Anything not in the dependencies list is removed from the path. If a necessary dependency is not specified in this list, Nix will refuse to run the expression.

One thing to note about these dependencies: they look like Haskell package names, but technically they are nix expressions in the same namespace as the snap.nix expression. By convention, nix expressions for Hackage packages are named slightly differently.

Cabal.mkDerivation

The call to cabal.mkDerivation is a function call defined elsewhere in the expression hierarchy, and each item specified within the curly braces is a named input argument to the function. The important items are mostly self-explanatory, but a couple could use some elaboration:

  • sha256 – a hash of the source code used to build the package. Nix checks the hash for consistency before building the package.
  • jailbreak – strips out the dependency version bounds from the cabal file before building.

Generating a Nix Expression with cabal2nix

Specifying a nix expression like the one for snap from scratch would be a huge PITA. Thankfully, NixOS has a sweet utility function called cabal2nix that essentially handles everything for us.

#!bash
nix-install haskellPackages.cabal2nix

First, make sure your hackages list is up to date.

#!bash
cabal update

Next, call cabal2nix and specify the hackage package name.

#!bash
[dan@nixos:~/Code/nixpkgs]$ cabal2nix cabal://snap-web-routes
  % Total    % Received % Xferd  Average Speed   Time    Time     Time  Current
                                 Dload  Upload   Total   Spent    Left  Speed
  0     0    0     0    0     0      0      0 --:--:-- --:--:-- --:--:--     0
  0     0    0  7161    0     0  12992      0 --:--:-- --:--:-- --:--:-- 12992
path is ‘/nix/store/wyilc14fjal3mbhw0269qsr5r84c5iva-snap-web-routes-0.5.0.0.tar.gz’
{ cabal, heist, mtl, snap, snapCore, text, webRoutes, xmlhtml }:

cabal.mkDerivation (self: {
  pname = "snap-web-routes";
  version = "0.5.0.0";
  sha256 = "1ml0b759k2n9bd2x4akz4dfyk8ywnpgrdlcymng4vhjxbzngnniv";
  buildDepends = [ heist mtl snap snapCore text webRoutes xmlhtml ];
  meta = {
    homepage = "https://github.com/lukerandall/snap-web-routes";
    description = "Type safe URLs for Snap";
    license = self.stdenv.lib.licenses.bsd3;
    platforms = self.ghc.meta.platforms;
  };
})

Boom. We get a complete nix expression without doing any work. Now we just need to put it in the right spot in the hierarchy. The rest of the hackage packages are in pkgs/development/libraries/haskell, so we’ll follow suit.

#!bash
[dan@nixos:~/Code/nixpkgs]$ mkdir pkgs/development/libraries/haskell/snap-web-routes

[dan@nixos:~/Code/nixpkgs]$ cabal2nix cabal://snap-web-routes > pkgs/development/libraries/haskell/snap-web-routes/default.nix

Now we can check that our expression actually runs. The nix-install function we added isn’t smart enough to handle --dry-run, so we’ll use the nix-env command directly.

#!bash
[dan@nixos:~/Code/nixpkgs]$ nix-env -iA haskellPackages.snapWebRoutes --dry-run
installing `haskell-snap-web-routes-ghc7.6.3-0.5.0.0'
these derivations will be built:
  /nix/store/f42ybqmcmq44nr73l6ap90l5wnm3s4kq-haskell-snap-web-routes-ghc7.6.3-0.5.0.0.drv
these paths will be fetched (21.88 MiB download, 416.87 MiB unpacked):
  /nix/store/0kw75f2qqx19vznsckw41wcp8zplwnl7-haskell-errors-ghc7.6.3-1.4.7
  /nix/store/14rjz7iaa9a1q8mlg00pmdhwwn7ypd4x-haskell-distributive-ghc7.6.3-0.4.4
  /nix/store/1jnipx1swkivg1ci0y7szdljklaj9cx1-haskell-skein-ghc7.6.3-1.0.9
...

So snap-web-routes will be built, and all of its dependencies will be fetched from pre-built binaries. Sweet! If the dry-run looks good, you can run the command again without the --dry-run option or use nix-install like we have previously. I omit that call here.

Note that this will install the package to your user environment. Remember: installing a package means making it active in the user environment. If you don’t want to install it, you can just build it with nix-build, which will put it in your store but it won’t be installed for the user.

#!bash
nix-build -A haskellPackages.snapWebRoutes

Make the Pull Request

Again, if you’re already adept at git and github, you can skip this section. We’re going to push our changes up to github and make a pull request. The process is largely automatic! Add the new .nix file to the git repo, commit the changes, and then push the branch to github.

#!bash
git add pkgs/development/libraries/haskell/snap-web-routes/default.nix
git commit -a -m "Added snapWebRoutes to haskellPackages."
git push origin add-haskell-snap-web-routes

Go to your github repo and you should see a prompt asking if you want to create a pull request; something like NixOS:master -> fluffynukeit:add-haskell-snap-web-routes. Follow the prompts and you’re done!


That’s it for this installment! New installments to come if/when I encounter new problems to write about!

Setting Up Vim (for Haskell)

This entry is part 4 of 6 in the series Setting Up Haskell Development on NixOS Linux from Scratch

In this installment, we are going to set up vim for Haskell development.  If you don’t want to use vim, you can skip this post entirely.  On the other hand, if you do want to use vim or are at least curious about trying it out (like me), then keep reading.

Chances are, if you do any kind of programming in a unix-like environment, you already know that vim is a text editor.  Its proponents claim that proficiency in vim enables you to code faster than in any other editor.  As for myself, my programming experience is mostly in IDEs, so I’m a veritable vim newbie.  When I first started experimenting in vim not too long ago, I found the number of configuration options and plugins to be overwhelming.  In fact, I’ve had to scrap several earlier version of this post as I found new combinations to try!  So, this post will explore just one possible vim configuration for Haskell development, and to be honest it’s one with which I have limited experience so far.  Still, I expect the baseline discussed here to be a good starting point for pretty much anybody.

As time goes on, I will likely change my vim configuration to better suit my needs as I discover them.  I plan to keep my vim configuration version controlled, so if you are curious about the latest version you can check it out. Also, this post is not a tutorial about how to use vim, but rather how to configure it for Haskell.  If you want practice with basic vim controls, you might want to try out the free levels of vim-adventures.

General Vim Options

Vim configuration is controlled through a the ~/.vimrc file.  This file is processed when vim first starts up and allows the user to configure vim in a huge number of ways.  Just wrapping your head around all the various options can be overwhelming.  Configuring vim means building this vimrc file to our liking.

Installing Vundle for Managing Plugins

One of the things that makes vim a popular editor choice is huge number of plugins available to customize your text editing experience.  Downloading plugins is easy, but to get vim to recognize your plugins, you have to mess with vim’s runtimepath variable.  This can get pretty tedious, but thankfully there are plugin managers that will do the work for us.  Vundle is one such declarative plugin manager, which fits with our NixOS theme.

Installing Vundle is a breeze.  First, execute the following command:

#!bash
git clone https://github.com/gmarik/Vundle.vim.git ~/.vim/bundle/Vundle.vim

This will make a bundle directory under which we will install our various plugins.  We’re not done yet, though.  We also need to add the following to the top of our .vimrc file to run Vundle at startup.  The comments are mine and optional

#!vim
" ========= VUNDLE CONFIG ===========
set nocompatible
filetype off
set rtp+=~/.vim/bundle/Vundle.vim
call vundle#begin()
Plugin 'gmarik/Vundle.vim'

" LIST PLUGINS HERE

" VUNDLE CLEANUP    
call vundle#end()
filetype plugin indent on

Essentially, this code is declaring that the Vundle plugin will manage itself. One downside of Vundle, however, is that the plugins must have a github repository to be managed.  If this is a problem for you, check out the alternative pathogen.

Installing General Utility Plugins

Next, we’ll install some utility plugins for vim, which will also demonstrate how to install plugins using Vundle generally.  The plugins I’m choosing are vim-sensible, vim-unimpaired, and syntastic.  Vim-sensible touts itself as being a standard set of defaults on which pretty much everyone can agree.  Vim-unimpaired adds lots of key bindings to make tasks like navigating through compiler errors, for example, a lot easier.  Syntastic runs syntax checkers and displays the errors in plain view. Simply add the following lines to the .vimrc file in the section I labeled LIST PLUGINS HERE.

#!vim
" LIST PLUGINS HERE
Plugin 'tpope/vim-unimpaired'
Plugin 'tpope/vim-sensible'
Plugin 'scrooloose/syntastic'
let g:syntastic_always_populate_loc_list=1
" A Haskell plugin we'll install later is 'dag/vim2hs',
" but installing it now is fine, too.

Save the file, (re)load vim, and enter :PluginInstall.  Vundle will set up the path to only use the plugins you’ve declared in .vimrc, kind of like NixOS does!  Cool.  A split screen should show up indicating the status of the selected plugins. If you ever want to add or remove plugins, just change the listed plugins in the .vimrc file and run :PluginInstall again.

The line let g:syntastic_always_populate_loc_list=1 configures syntastic to put the errors in the vim locations list, which allows us to jump through the errors using the vim-unimpaired bindings of [L, ]L, [l, and ]l.

Adding Custom Options Directly

The above plugins do a good job of setting up some standard options, but everyone prefers their own twist on things.  Mine is given below, which I put in my .vimrc file after the Vundle settings.  Each setting is commented to explain what’s going on.

#!vim
" ========== GENERAL VIM SETTINGS ==========
" Enable search highlighting
set hlsearch
" Enable line numbers
set number
" Use F11 to toggle between paste and nopaste
set pastetoggle=<F11>

" vim-sensible enables smarttab. Here, we configure the rest:
" Set the display size of \t characters
set tabstop=2
" When hitting , insert combination of \t and spaces for this width.
" This combination is deleted as if it were 1 \t when using backspace.
set softtabstop=2
" Set code-shifting width. Since smarttab is enabled, this is also the tab
" insert size for the beginning of a line.
set shiftwidth=2
" When inserting tab characters, use spaces instead
set expandtab

" Instead of failing command, present dialog if unsaved changes
set confirm

" Enable mouse in all modes
set mouse=a

" Map jk and kj to  to exit insert mode. We need to use F11 to toggle to
" paste mode before pasting any string with jk or kj, then switch back. When
" inserting jk or kj manually, we will need to type the keys slowly so that
" the key mapping times out. Using jk or kj to escape is easier than many
" other alternatives.
ino jk <Esc>
ino kj <Esc>

" Set a vertical line for long line width. This will give us a visual
" indicator for cases in which line length is approaching 80 chars
set colorcolumn=80
" Set the command section height to 2 lines.  Useful if notices (like syntastic) are shown on command lines
set cmdheight=2

Customizations for Haskell

Now we’ll add some new features for our vim installation specifically to work with Haskell.

ghcmod

Installing the syntastic plugin for syntax checking was only part of the story as syntastic only runs external syntax checkers and displays their results. So now we need a syntax checker. Enter ghcmod.

#!bash
nix-install haskellPackages.ghcMod

That’s it. Syntastic will recognize that ghcmod is installed and run it whenever a Haskell file is saved. To verify that it’s being recognized, open a Haskell file, type some Haskell code, then run :SyntasticInfo, which will show what checkers syntastic plans to use for the file. You can also run the checkers explicitly with :SyntasticCheck.

vim2hs

vim2hs is a vim plugin for Haskell syntax highlighting and linting, among other things.  It seems more lightweight than the haskellmode-vim alternative plugin and was highly recommended in a reddit discussion about vim and Haskell.  Let’s give it shot.

#!vim
Plugin 'dag/vim2hs'

Remember to re-run :PluginInstall within vim after updating .vimrc.


That’s it for the basic vim setup. Changing the color scheme, customizing the display, and other items related more toward personal taste are left for you to explore!

Installing Essential Software In NixOS

This entry is part 3 of 6 in the series Setting Up Haskell Development on NixOS Linux from Scratch

Welcome to part 3 of my series on setting up NixOS for Haskell development!  In this part, we’ll learn how to discover and install essential software for NixOS.  We won’t cover the particulars of installing Haskell-related components (I’m saving that for a post on its own), but some of our decisions here will be motivated by the foresight that Haskell development is what we eventually want to do.  As always, if you see an error, please let me know.  I’m figuring this stuff out as I go.

In the last post, we learned a bit about the Nix package manager.  Let’s recap the essential points:

  • All software components in NixOS are installed using the Nix package manager.
  • Packages in Nix are defined using the nix language to create nix expressions.
  • Nix expressions define all inputs to a build process, including dependencies, which can themselves be nix expressions.
  • Nix will build all required dependencies if they do not already exist on your system.
  • Packages installed for all users are defined in the nix expression /etc/nixos/configuration.nix

The rest of this post will focus on how to install packages into your user environment.  These are the packages that are active on a per-user basis, so other users won’t necessarily have the same active packages as you do.

Finding and Installing Packages

Packages are installed by running Nix expressions, so how do we find Nix expressions?  There are actually a few different ways to get them.

  • Use the nix expressions that are included with your installation of NixOS, which are part of a nix channel.  A nix channel allows you to easily download updated expressions as well as pre-compiled binaries.
  • Download a set of nix expressions from the internet.
  • Subscribe to a new nix channel to download more up-to-date software packages than are available in the default channel.

Let’s explore each one of these in turn.  Spoiler alert: we’ll use 1) early on but most of our time will be spent with 2).  I’ll touch on 3), but honestly it’s not something I recommend if you’re doing Haskell development because I don’t think it offers much, if anything, over option 2).

Expressions Available through NixOS Installation

Your NixOS installation comes with a set of packages that are included by default.  These are installed in /nix/var/nix/profiles/per-user/root/channels/nixos, but NixOS is kind enough to give you a shortcut via ~/.nix-defexpr/channels_root/nixos.  This is the default location from which nix expressions are run.  It also happens to be a nix channel, but I’ll discuss nix channels later.  The key point is that NixOS comes with oodles of expressions built-in and ready to be run.  In fact, let’s run one right now in preparation for later steps.  We’ll install git. All of the manipulations of the user environment are invoked using the nix-env command. For example, if we want to see a list of all available packages from the built-in expressions

#!bash
nix-env -qaP --description *

Here, q means query, a means available packages, and P means show the attribute path, which is essentially a way to specify a particular expression instead of using the software package name.  The description option includes the description of the packages, as well.  In the case of git, we’ll see this among the long list of available packages:

#!bash
nixos.pkgs.gitAndTools.gitFull  git-1.9.4  Git, a popular distributed version control system

The software is named git-1.9.4, but the attribute path specifying the nix expression used to build it is nixos.pkgs.gitAndTools.gitFull.  We can use either the package name or the attribute path to install git, but the attribute path is the recommended strategy since it removes all ambiguity about which package should be installed and how. 

So let’s install git using the following command:

#!bash
nix-env -iA nixos.pkgs.gitAndTools.gitFull

Nix will then download all dependencies that you don’t already have (which, since this is our first installation, is all of them) and install git.  Here the flag i means install and A means by attribute path (yes, it bothers me that query commands use -P and install commands use -A).  We can verify the installation worked successfully by querying the list of installed packages in the user environment.

#!bash
nix-env -q --installed

The command above should list git as being an installed package.

Installing from Downloaded Expressions

Another approach to getting expressions is to download a collection of them from the internet.  The most popular collection is the nixpkgs repository on github.  In fact, the nix expressions that are bundled with NixOS (and which we explored above) are simply a stable version of this nixpkgs repository.

While the nixpkgs repository has a lot of available Haskell packages already, I quickly ran into ones that I needed but weren’t included.  Properly installing these packages requires adding new nix expressions to the available set.  This is why I recommend running downloaded nix expressions as the default method of installation for Haskell developers; most likely, you’ll be adding and running your own expressions anyway, and you can pull in updates with git just as easily as you can using nix channels.

Since Nix is declarative, our expressions will be useful for everyone else, too, so why not contribute them back to nixpkgs?  For this, we’ll need to fork the nixpkgs repository and then clone our fork to our local machine.  Any updates made locally can be made on a branch, pushed back to github, and then pulled into the main nixpkgs repository. FYI: when I cloned the repository, it was about 125 MB in size.

After you fork and clone the repo locally, cd to its root.  We’re going to run pretty much the same nix-env command we did before, except now we use the -f flag to read the nix expressions from the directory.  Personally, I’m trying to get good at vim, so I’ll be querying for it with the following:

#!bash
nix-env -f . -qaP --description vim
vim  vim-7.4.316  The most popular clone of the VI editor

Pretty easy.  In this case, I got lucky and was able to guess the package name “vim” correctly, but in general there are better ways to search, as we’ll find later. Installation is also an analogous command.

#!bash
nix-env -f . -iA vim

We’ll investigate how to update this local nixpkgs repository with our own additions in a future post.

Subscribing to a New Channel

The third option for getting expressions is to subscribe to a new channel.  I say new channel because all NixOS installations are automatically subscribed to the channel associated with the released OS version.  For instance, I can inspect the default channel’s manifest and see that it’s for NixOS version 14.04.

#!bash
cat ~/.nix-defexpr/channels_root/manifest.nix 
[ { meta = { }; name = "nixos-14.04.312.b84584f"; .......

Ok, but what is a channel?  A channel is a set of nix expressions combined with a manifest file.  The manifest file describes what binaries are available for downloading instead of building from scratch, so they can save you a lot of time if you are doing many installations. 

You can pull in new updates from a channel using the nix-channel --update command. The default channel is not really sufficient for development purposes because we want to add and run our own nix expressions.  As such, I’m glossing over channels in favor of pulling updates in from the git repository directly.  I admit I’m not the most knowledgeable about channels, so if there some best practices out there to make working with them easier, please let me know.

Enhancing the Nix Experience

We have seen how to query and install packages using Nix, but there are some small customizations we can make to make our development lives a bit easier.  Instead of using nix-env and specifying our standard set of flags again and again, we can write some custom bash commands to do most of the typing for us. One problem: how can we search for packages by keyword?  The nix-env command takes a package name as an input, not a general keyword. Thankfully, we have grep, which can search through the large list of available packages and find keywords and regular expressions for us. The code below defines a new bash command nix-search that will search through all the expressions in our git repository looking for matches of a particular keyword or regular expression.  Searching for the right expression to install will be much easier.

#!bash
nix-search(){ echo "Searching..."; nix-env -f ~/Code/nixpkgs -qaP --description \* | grep -i "$1"; }

All this hard-coding of -f ~/Code/nixpkgs is a problem waiting to happen, though. A better way is to use the .nix-defexpr folder to simply change the default location that Nix searches for expressions. In doing so, we won’t even need the -f flag anymore.

One thing I’d like is to have .nix-defexpr be a link itself to my ~/Code/nixpkgs directory. Otherwise, my attribute paths will need some kind of prefix, and since I only want to use expressions under ~/Code/nixpkgs, using this unnecessary prefix will get a little annoying. Normally, we could simply make .nix-defexpr a link to the right directory, but it turns out that if .nix-defexpr is a link, it is deleted when you log in and replaced with the Nix default. So, as a work around, I’m adding code to my .bashrc file to set up .nix-defexpr the way I want when I open the terminal.

We also should change the NIX_PATH environment variable similarly to what I have done below.

#!bash
# In ~/.bashrc
rm -r ~/.nix-defexpr
ln -s /home/dan/Code/nixpkgs ~/.nix-defexpr

# Then export the right env variables:
export NIX_PATH=/home/dan/Code:nixos-config=/etc/nixos/configuration.nix;
nix-search(){ echo "Searching..."; nix-env -qaP --description \* | grep -i "$1"; }

We can make installing easier too by writing a new command to run expressions from our git repo, specified by attribute path.

#!bash
nix-install(){ nix-env -iA $1; }

The first version of this post used the -f flag exclusively because I didn’t yet know about NIX_PATH and .nix-defexpr. Having a nix-install helper function makes more sense when the -f flag was being used, but in its current form it doesn’t save any keystrokes. The user may use her discretion when deciding whether or not to use nix-install.

Put both functions into the .bashrc file in your home directory, then use source ~/.bashrc to reload the .bashrc file for the updates to take effect.  We can use the new commands like this (might need to scroll right!):

#!bash
[dan@nixos:~]$ nix-search vim
Searching...
bvi                                                                 bvi-1.3.2                                                                     Hex editor with vim style keybindings
qvim                                                                qvim-7.4                                                                      The most popular clone of the VI editor (Qt GUI fork)
vim                                                                 vim-7.4.316                                                                   The most popular clone of the VI editor
vimWrapper                                                          vim-with-vimrc-7.4.316                                                        The most popular clone of the VI editor
vimb                                                                vimb-2.4                                                                      A Vim-like browser
vimbWrapper                                                         vimb-with-plugins-2.4                                                         A Vim-like browser (with plugins: )
vimprobable2                                                        vimprobable2-1.4.2                                                            Vimprobable is a web browser that behaves like the Vimperator plugin available for Mozilla Firefox 
vimprobable2Wrapper                                                 vimprobable2-with-plugins-1.4.2                                               Vimprobable is a web browser that behaves like the Vimperator plugin available for Mozilla Firefox  (with plugins: )
vimNox                                                              vim_configurable-7.4.316                                                      The most popular clone of the VI editor
vimHugeX                                                            vim_configurable-7.4.316                                                      The most popular clone of the VI editor
vimHugeXWrapper                                                     vim_configurable-with-vimrc-7.4.316                                           The most popular clone of the VI editor

[dan@nixos:~]$ nix-install vim
replacing old `vim-7.4.316'
installing `vim-7.4.316'

An Aside About Nix Search Paths

I have had to update this post a few times as I learn more about how Nix search paths work. I have tried to keep everything mentioned here correct and consistent, but having everything clearly spelled out is valuable. Here’s my most up-to-date knowledge:

  • By default, the nix-env command searches the expressions contained in the ~/.nix-defexpr directory. This directory can have subfolders or symbolic links to any other directories, and Nix will prepend any attributes with the symbolic link name. For instance, if .nix-defexpr contained a link dans_nixpkgs -> ~/Code/nixpkgs, then searches using nix-env will show attributes as dans_nixpkgs.haskellPackages.snap, for instance.
  • By making .nix-defexpr a symbolic link itself, you can eliminate the prefixes, but .nix-defexpr will be reset back to the default the next time you boot the machine. As a work around, I have placed code in my .bashrc file to set it up the way I want each time a terminal is opened.
  • The .nix-defexpr default location is what is overridden when using the -f flag.
  • The NIX_PATH environment variable is used when resolving <brackets> in nix expressions. For example, NIX_PATH=/home/dan/Code will lead to <nixpkgs> resolving to /home/dan/Code/nixpkgs. It has no effect on the nix-env command itself.
  • nixos-config must point to the configuration.nix file or else nixos-rebuild calls will fail.

Installing Haskell Platform and GHC

We can use our new bash commands to start installing our required Haskell packages.  In the past, I have tried to avoid Haskell Platform because, invariably, I would need a different version of one of the packages it offers or I would need a package that isn’t included.  Unfortunately, following either of these scenarios has sometimes required that I re-install all my packages from scratch to resolve odd dependency conflicts. But, this is NixOS, and the claim is that NixOS is designed to prevent that kind of baloney from happening.  Only time and experience will tell if that’s true, but in the meantime we’ll barge right ahead and get Haskell Platform since it is often suggested as the best way to get started with Haskell.

#!bash
[dan@nixos:~]$ nix-search "haskell platform"
Searching...
&lt;omitted&gt;
haskellPlatform                                                     haskell-platform-2013.2.0.0                                                   Haskell Platform meta package
[dan@nixos:~]$ nix-install haskellPlatform 

After installation is complete, we will have Haskell Platform 2013.2.0.0 installed, which used ghc 7.6.3 to build.   However, we did not yet install ghc because NixOS only puts packages we install on the path, not their dependencies. Installing ghc is now a fast operation because all NixOS is doing is adding the existing executable to the path. At the same time, let’s install cabal.

#!bash
nix-install haskellPackages.ghc
nix-install haskellPackages.cabalInstall

I have received reports from some users that haskellPackages.ghc doesn’t work for them, but haskellPlatform.ghc does, so give that a try if the above doesn’t work for you.


That’s it for this installment.  Check back soon for the next *exciting *post in this series, although I’m not yet sure what it will be.

Installing NixOS

This entry is part 2 of 6 in the series Setting Up Haskell Development on NixOS Linux from Scratch

In the last post of this series, we set up a VM to run NixOS using VirtualBox.  Now we actually need to go ahead and install NixOS.  We’ll be installing it into our VM, but if you are installing it into an actual machine, most of the instructions here will work for you.

This post is based on this article on the NixOS wiki, but there are some differences because I chose to configure NixOS differently.

Installing NixOS

  1. Go to the NixOS download page and download a release of NixOS.  At the time of this writing, the newest release is 14.04, and I chose the Graphical Live CD, 64-bit Intel/AMD version, which is recommended for most users.
  2. Open up the VirtualBox VM Manager and select your NixOS VM.  Then choose Settings > Storage.  Click the CD icon in the storage tree.  Then, on the right side under Attributes, click the CD icon to choose a virtual CD/DVD file.  Select the nixos ISO file you downloaded in step 1.NixOS Boot
  3. Click OK, then start.  You should see the following menu.  Choose the first option, NixOS installer.  It is chosen for you automatically after about 10 seconds.GRUB Installer
  4. After the NixOS installer boots up, you’ll be at a terminal login prompt that tells you to login as root.  Enter root for your login name and hit enter.
  5. So far, we haven’t actually installed anything.  Before we can do that, we need to initialize the file system on our virtual machine so it can read and write files to our virtual disk we set up in the previous post.  The first thing to do is create a partition on our virtual disk.  Type
    fdisk /dev/sda

    to run the disk partitioning program, which has a simple but completely non-intuitive interface.  The commands I entered, in order, are n (for new partition), p (for primary partition), 1 (assign partition number 1), no selection (defaults to 2048 for start of partition), and no selection (again, default).  Finally, I enter w to write the partition to disk.  See below.Parition Disk

  6. Next, we need to make a file system onto our new partition.  Enter
    mkfs.ext4 -j -L nixos /dev/sda1

    This command will make a new file system with the ext4 format into partition 1 of sda, enable journaling, and give our new filesystem the label nixos.

  7. Now that we created the filesystem, we need to mount it.  Mounting it is like connecting different filesystems together, but in this case we need to connect our filesystem to the OS.  Mount the filesystem with
    mount LABEL=nixos /mnt

That’s the last step in setting up the disk and file system.  Next, we’ll configure NixOS itself.

Configuring NixOS

If you just want to get NixOS set up as fast as possible, skip to the instructions below.  Before I get to that, however, I’ll briefly describe the Nix philosophy and implementation from a few different levels.  These are just my impressions and understanding from using NixOS for a few days, but I have found this information to be crucial in order to do anything useful.

NixOS is a Linux distribution built around the Nix package manager, which is available for installation on other OSes if you want, but is the only package manager for NixOS.  Every piece of software installed on the entire system is installed through Nix.

So what makes Nix useful?  In most other package managers, new versions of software replace older versions.  If some component of the system depends on that software but is incompatible with the new version, then it will break after the upgrade.  Extend this problem to the huge graph of intermingling dependencies among all the software on a user’s computer and you get what’s called dependency hell.  Other Linux distributions try to prevent dependency hell by keeping official lists of software packages that are expected to be compatible, installing packages from this list, and occasionally updating the list with new versions.

Nix, on the other hand, installs new version of software side-by-side with their older versions, and older versions are deleted only when they are no longer required.  Nix achieves this through a combination of two mechanisms: a sophisticated system of sym links that keeps track of which version of packages are “active” at any time and a build system that exhaustively describes every input into each individual package.

The second part is the part we need to understand for our next steps.  Installing new software requires writing a Nix expression that completely describes all the prerequisites and dependencies for the software to be installed.  These dependencies can themselves be Nix expressions defined elsewhere.  When we install new packages, what we are doing is running a Nix expression for that package.  Nix first recursively ensures all build dependencies are available, either by checking that they are already built or by running Nix expressions to build them.  Then, it builds and installs our new package.

This is exactly the process we’ll use to install NixOS itself.

  1. First, we need an expression that will define the components we want to build and install.  We can make one and configure it using
    nixos-generate-config --root /mnt 
    nano /mnt/etc/nixos/configuration.nix

    This will open the configuration.nix expression in the nano editor.

  2. The configuration looks something like the one below.  Use the arrow keys to navigate through the file.  Lines marked with a # are comments, and several important configuration lines are commented out by default.  Use nano to move the cursor around and delete the # to enable the features you want.  In the picture, I have deleted the #s for boot.loader.grub, networking.hostName, and networking.wireless.enable.  I also uncommented all the lines that begin with services.xserver to enable a GUI.  I also uncommented the lines at the bottom of the file that add a new user and modified them as shown.  When you are done, use Ctrl-O to save the changes and Ctrl-X to exit.Nix configNix User Config
  3. With the configuration.nix nix expression defined, we are ready to install NixOS! Run
    nixos-install

    to start the installation.  If there is a problem with the filesystem and the installation refuses to start, you can redo the steps starting with the fdisk step, but use d (for delete) as the first command to delete the primary partition and start fresh.

  4. After installation completes, shut down the virtual machine, and in the VirtualBox Manager go to Settings > Storage, click on the CD on the right hand side and choose “Remove disc from virtual drive.”  This removes the NixOS installer from the boot menu so we don’t boot into it by default.  Then start the VM again.
  5. When the VM boots up, you should see a graphical login window.  We can’t log in yet because we need to change some passwords first.  To do this, we need to use the command line again.  Access the console login using the Power drop down menu.Console Login
  6. Log in as root, which still has no password.  We will change that right now with
    passwd

    Enter a new root password for your system.  If you created any users, you can set their passwords also with, for example,

    passwd dan
  7. reboot one final time and verify you can log in successfully.

That’s it! whew Next in the series, we’ll tackle how to install essential software.

Installing VirtualBox (for NixOS)

This entry is part 1 of 6 in the series Setting Up Haskell Development on NixOS Linux from Scratch

Welcome to the first installment of my series about setting up Haskell development on NixOS Linux from scratch!

I consider myself somewhere in the beginning-intermediate stages of Haskell skill, having created a useful application for Windows as learning exercise.  However, to really take my Haskell skill to the next level, I needed to migrate to the de facto standard Haskell environment – Linux.  Ollie Charles, a Haskell reddit member who writes the wonderful 24 Days of Hackage tutorial series on his site, has adopted NixOS as his Linux distro of choice and wrote a blog post describing how to get started.  I decided to trust his choice and try it out for myself.

As I dove deeper into the rabbit hole of getting my environment set up properly, I found myself getting frustrated with having to search all over the net for tutorials, walkthroughs, and installation help just to get everything set up.  Indeed, Ollie’s post does a good job giving the flavor of Haskell development on NixOS, but it’s not comprehensive enough to provide the whole story.  The goal of this series is to provide that whole story as I discover it myself.  If something in these posts is unclear or flat out wrong, please let me know!

Ok, with the introduction out of the way, let’s jump right in.

Installing VirtualBox

VirtualBox is a free program from Oracle that allows you to run a virtual machine on a host computer.  In this case, we’ll use a virtual machine to run NixOS and host the VM on Windows.

  1. Download VirtualBox installer from here.  At the time of this writing, the latest version is 4.3.12.  Since we are hosting the VM on a Windows computer, we want VirtualBox 4.3.12 for Windows hosts.
  2. Run the installer.  You’ll see something like the screen below.  I accepted all the defaults except I don’t like shortcuts on my desktop, so I disabled that (on the next screen).  Also, I got a warning that I would be temporarily disconnected from my network as part of the installation process.Virtual Box Installer
  3. Wait for installation to complete.  If you are prompted to install devices, go ahead and install them.  Installation took 10-20 seconds for me.

Create a virtual machine to run NixOS

Now that we have VirtualBox installed, we need to create a virtual machine that will run our NixOS distribution.

  1. Start your newly installed VirtualBox software.  When you start it up, you’ll be at the VirtualBox Manager window.  From this window, you can create and manage multiple virtual machines that all run inside the host computer.  We only need to create one, though.  Click the blue New button.
  2. Now we’re at the Create Virtual Machine Wizard, which looks something like the window below.  Your selections will be similar to mine but might need to be different based on your computer architecture.  I have a 64 bit machine, so I chose Other Linux (64-bit).  You can also use whatever Name you like.  I happen to know I will be using NixOS 14.04.Create VM
  3. Next you will choose the amount of RAM for the VM.  This is the amount of RAM your VM reserves for its own use while you are running it.  My machine has 8 GB total, so I allocated 4 GB (4096 MB) to my VM because I never plan to run it at the same time as another RAM-hungry process.VM Ram Size
  4. At the next screen, you are prompted to create a virtual hard drive.  Choose to create a new drive now and choose the VDI format on the next screen.  After that, choose “Dynamically Allocated,” which allows your VM to take up hard drive space as it needs it instead of reserving it all up front.  Lastly, choose the size of your new virtual drive.  The default setting for me is 8 GB, which sounds sufficient for small development box.  Besides, if we run low on space, we can increase the size later.VM Hard Drive Size
  5. After that, your VM is created!  You can now click on the orange Settings gear to explore different ways to configure your VM.  I plan to run with the defaults until I decide I need more processing power or otherwise need to change the settings. The only thing I changed was under General ? Advanced where I changed Shared Clipboard and Drag’n’Drop to both be bidirectional.

And that’s it! Don’t bother starting the VM yet, though.  There’s no point until we install the NixOS operating system onto it.  We’ll cover that in Part 2.


FNIStash r1.4 released!

It’s been a long while, but a new version of FNIStash is available. r1.4 adds only one feature, but it will be really useful for some people. In this release, you can optionally configure where the fnistash.db file is located on your system. You can even point it to a network drive! Now you and a friend can share the same FNIStash database, but be careful: only one of you should run FNIStash at a time.

This release is a change I made for a user request quite some time ago but never got around to releasing. It has worked for her without any problem that I know of.

So I looked at the download logs for FNIStash releases, and there are now several hundred users!  Not bad.

The last 6 months has been a tumultuous time for me.  My wife got a new job, I left my old job and got a new one, and I moved to the Seattle area.  The process has been MUCH longer than I would have liked or anticipated, but today officially marks the end of it because my wife is finally joining me in Washington.

FNIStash r1.3 released!

It’s been a pretty wild 1-2 months since I released 1.0 of FNIStash, both for me personally and for the program itself.  I’m glad that it has been very warmly received and that so many people are giving me good feedback.  It has gone through a few subsequent releases to fix bugs and add new features, the biggest probably being the ability to delete items from the Registry.  It has been downloaded over 150 times, which is pretty good I think considering I don’t publicize it much.

Other things in my life include developing a website with my brother (which, sadly, we lost our momentum on, but I hope we can get it back in the future), illness, my mother-in-law returning to China after a bureaucratic nightmare, and a shakeup at work.  So my attention to this blog has waned, but I expect this kind of transitional period in my life to get wrapped up in short order.

FNIStash r1.0 released!

It’s been a long time coming, but I have made the first release of FNIStash!  I consider this release experimental until all the bugs are worked out.  So far I have already received some good feedback and a couple of bug/compatibility reports.  Follow the links below for more.

FNIStash homepage, with video tutorial

Announcement of FNIStash on Runic Games Forum

Announcement of FNIStash on r/Torchlight subreddit

It was a long, educational experience writing this program.  I think I got a good feel for Haskell and hope my next project with the language focuses more on good habits and style instead of focusing almost solely on making a functional product.  I’d like to eventually write up a post-mortem of my experience of building a non-trivial application in Haskell as a 100% FP and Haskell newb, so look for that in the future if you’re interested.

Improving memory performance in Haskell programs

I ran into a big problem recently in FNIStash – I realized that it was using way more memory than I thought it should.  What followed was a couple weeks of arduous investigation and learning about Haskell.  If you find your program has a memory leak that is not due to thunks, these tips might help you out.  Note that this all applies to the de facto standard compiler, GHC.

Understanding memory usage

The first step to figuring out why your program is using a lot of memory is to measure it.  You can enable profiling by compiling your program with the -prof and -rtsopts compilation flags.  This enables profiling and allows you to control it from the RTS options passed from the command line when you run the program.  For example,

MyProgram.exe +RTS -hy

will run the program and categorize memory usage by type.  There are lots of categorization options available, such as by module or function.

When your program terminates, you’ll get a .hp file in the same directory as the executable.  You can convert it to a viewable PS or PDF file using

hp2ps -e8in -c MyProgram.hp 
ps2pdf MyProgram.ps

The result is something like this.

Memory profile of FNIStash categorize by type.

Memory profile of FNIStash categorize by type.

Here we can see that most of the memory is used up by ARR_WORDS, which is a backing type for ByteString and Text, among other things.  Since FNIStash reads and parses an archive of binary files, this makes sense.  However, the magnitude of the plot maxes out at around 25 MB.  Why, then, does Windows report over 70 MB of memory used?

Memory footprint of FNIStash

The discrepancy is due a couple of factors:

  1. First, the profiling doesn’t come for free.  Compiling with the -prof option necessitates more memory just for reporting purposes.  This requires approximately 30% more memory than usual.  This overhead isn’t reported on the plot, but the OS sees it.
  2. The reported memory usage is only “live memory.”  It doesn’t include old data that has not been collected by the garbage collector yet.  In fact, in very loose terms, the default GHC GC waits until live data grows to the size of old data before collecting it.  This means your program might use twice as much memory as needed.  Note that when the garbage collector does run, it temporarily needs more space to reorganize the live data, so if a large amount of data is being collected at once, you can see memory usage (as reported by the OS) spike up.
  3. FNIStash, in particular, has some kind of memory leak.  Right after start up, the OS memory usage was around 66 MB, but crept up to 70 MB after some minor GUI interaction.  It’s actually unclear to me whether the leaked memory is reported in the plot.

So if we discount the leaked memory, then we have 66 MB / 1.3 / 2 = 25 MB, which is right in line with what the graph reports.  Turning off profiling saves an easy 30% of OS memory usage, but what if you want to save more?  How can the memory leak be fixed?  Are you stuck with using twice as much memory as necessary?

Fixing the leak

Fixing the memory leak was a Sisyphean process of changing data types, adding strictness, and other futile efforts until I found the magic bullet: the threaded run time system.  By default, Haskell uses a single-threaded RTS (meaning 1 OS thread) that can nonetheless provide concurrency.  Indeed, FNIStash uses multiple threads to run the frontend and backend separately.  The -threaded flag enables the multi-threaded RTS (multiple OS threads), and using it completely obliterated the terrible memory creep I was seeing in the Task Manager.  I don’t know why this is.  My suspicion is that the idle-time GC that comes with -threaded more aggressively cleans up.  Given the number of cores on modern machines, I plan to make this my standard in the future.

Tuning the garbage collector

GHC enables the user to tune the garbage collector from the command line using RTS arguments.  Here are the ones that I tested out.  To use them, your program must be compiled with the -rtsopts flag.  Additionally, and this is totally anecdotal on my part, it seems that having -prof enabled at the same time prevents any of these options from having an effect, so if you notice this you might want to compile without -prof.

  • -c : This option changes the GC algorithm to use a slower compacting strategy instead of a copying strategy.  What I think this mean is that instead of copying bytes around the heap when running GC, data gets compacted near where it already is.  The end result is less heap usage.  In my case, using this option yielded savings of around 10%.
  • -Ffactor : Here “factor” is a value.  By default, GHC uses a value of 2.  This is the growth factor allowed before GC is run.  If you make this smaller, GC will be run more often.  However, this didn’t seem to help me out much.
  • -Gx : If x = 1, this enables the single generation collector.  I used this option without any others, and it actually increased my memory usage considerably and made my program much slower.  I also tried G3, but that used a lot more memory as well.

In the end, I decided that killing the leak with the threaded RTS was enough for me.  I don’t need extra memory savings by using -c for the moment.  So I went from 70+ MB with a leak down to 48 MB with no leak by using -threaded and removing -prof.  The real benefit, however, was learning more about GHC’s runtime system.