How functional programming lenses work

Lenses can be a powerful component of a functional programmer’s toolbox. This post is not about their power or how you can use them. There are plenty of decent tutorials for that, so if you want to know what the lens fuss is about, I encourage you to check them out.

Instead, I will try to explain the magic behind how lenses work. After scrutinizing the types and code for a while, I finally had my burrito moment, so hopefully this explanation helps someone else out. I’ll be explaining the implementation behind the purescript-lens library, which is modeled after the Haskell lens library. Other implementations might be out there, too, but this is the one I’m focusing on. If you’ve ever looked at this implementation and wondered “How the hell do you get a getter and setter out of that?!”, then this post is meant for you.

The gist: a lens is a function that executes a series of steps to get an intermediate result, performs an operation on the intermediate result, then follows the series of steps backwards to build up a new result. The manner in which the new result is built up is controlled by the functor used by the operation.

Lens type explained

A lens is a function with the following type:

type Lens s t a b = forall f. (Functor f) => (a -> f b) -> s -> f t

Looking at this type, it’s a little difficult to see what is going on. Essentially, a lens uses an operation a -> f b to convert data of type s into data of type f t. I call a -> f b the focus conversion and s -> f t the lens conversion.

Let’s start with the types s and a. s is the parent object that is being inspected, and a is the part of the parent the lens puts focus on. For example:

type Foo = 
    { foo :: {bar :: Number} 
    , baz :: Boolean }

bazL :: Lens Foo Foo Boolean Boolean

The bazL type definition using Foo Foo instead of two different types simply means that the lens conversion does not transform inputs of type Foo into some unrelated type, excepting the functor f. Indeed, a Foo input will become an f Foo output of the lens conversion. Similarly, Boolean Boolean indicates that the focus conversion does not change the type of of the focus (again, excepting the functor f) – Boolean becomes f Boolean .

This is the common pattern used to define a lens that works as both a getter and a setter. It’s so common that most lens libraries define a type synonym for it type LensP s a = Lens s s a a.

More than just a getter and setter

Getters and setters are common use cases for lenses, but really lenses perform a complete transformation across data. This is why there are four type variables instead of just two. Let’s look at a more general type for the bazL lens that allows it to operate on any record with the baz field and transform any baz type a into f b.

bazL :: forall a b r. Lens {baz :: a | r} {baz :: b | r} a b
bazL = lens (\o -> o.baz) (\o x -> o{baz = x})

This type indicates that the lens conversion is from a record with a baz field of any type to a record of a baz field with a possibly different type (wrapped in a functor). The focus conversion goes from a type a to a type f b. The lens function above is a utility function that builds a lens that can be used as both a getter and a setter from a getter function and a setter function.

Is it possible for a lens to have type Lens a a b c, meaning the focus conversion performs a type change but the lens conversion does not? I’m actually not sure, but I think yes. Such a lens could be composed with Lens b c d d to get Lens a a d d, which is the familiar type we already know. In fact, lens composition is just normal function composition because lenses are just regular functions!

Behind the curtain

What’s going on behind the scenes when we compose lenses? Let’s look at our Foo type again, along with a couple new lenses and the lens help function.

type Foo = 
    { foo :: {bar :: Number} 
    , baz :: Boolean }

fooL :: forall a b r. Lens {foo :: a | r} {foo :: b | r} a b 
fooL = lens (\o -> o.foo) (\o x -> o{foo = x})

barL :: forall a b r. Lens {bar :: a | r} {bar :: b | r} a b 
barL = lens (\o -> o.bar) (\o x -> o{bar = x})

lens :: forall s t a b. (s -> a) -> (s -> b -> t) -> Lens s t a b 
lens s2a s2b2t a2fb s = s2b2t s <$> a2fb (s2a s)

When we use lens to build fooL from a getter and a setter, here’s what the result looks like, with types specialized for our Foo data type instead of the more general extensible record types.

fooL :: ({bar :: Number} -> f {bar :: Number}) -> Foo -> f Foo 
fooL focusCon parent = 
    (\o x -> o{foo = x}) parent <$> focusCon ((\o -> o.foo) parent) 
-- which we can simplify to 
fooL focusCon parent = \x -> parent{foo = x} <$> focusCon (parent.foo)

Our resulting lens applies the focusCon function to parent.foo, then incorporates the result back into the parent structure using <$> applied for the functor.

The resulting fooL lens is just function, so we can compose it with other functions.

(..) = (<<<) -- normal function composition
(..) :: (b -> c) -> (a -> b) -> a -> c
(..) f g a = f (g a)
-- or alternatively
(..) f g = \a -> f (g a)

When we compose lenses fooL..barL, we have:

fooL..barL =
\fc -> fooL (barL fc) =
\fc parent -> \x -> parent{foo = x} <$> (barL fc) (parent.foo) =
\fc parent -> \x -> parent{foo = x} <$> 
    (\parent2 -> \y -> parent2{bar = y} <$> fc parent2.bar) 
    parent.foo

-- and now we can reason the following

fc :: Number -> f Number -- fc is the focus conversion function
parent :: Foo
fooL..barL :: (Number -> f Number) -> Foo -> f Foo
fooL..barL :: Lens Foo Foo Number Number

That’s amazing! Lenses compose using normal function composition.

Take a second look at the function pipeline above and assume that the focus conversion fc has been defined already. First, parent.foo is piped in as parent2. fc is applied to parent2.bar to give a result of type f Number. The result is mapped over using <$> to apply \y -> parent2{bar = y} to get a result of f {bar :: Number}. This is then mapped over again using <$> to get a result of type f Foo, which is the output of the lens conversion.

This is the essence of a lens; the composed lens looks deep within the object, focuses on a value of a certain type, does something with that type, then recurses back up the object, “combining” the results together using <$>.

That functor magic

One thing we haven’t looked at yet is the type variable f, the functor used by the focus conversion function. Not only is the functor used in the focus conversion function, but it is also used every time the lens recurses up one layer of the object and combines the results together. The functor, therefore, controls how the new result is built out intermediate results. The choice of functor is what determines the behavior of the lens.

Let’s take our fooL..barL example again.

fooL..barL =
\fc parent -> \x -> parent{foo = x} <$> 
    (\parent2 -> \y -> parent2{bar = y} <$> fc parent2.bar) 
    parent.foo

Let’s pick the Const functor for f, which has the following implementation (<$>) fx (Const x) = Const x. In other words, no matter what function fx is applied with <$>, a Const x value will never change. Let’s see what happens when we simplify our lens using Const as the focus function.

fooL..barL Const =
\parent -> \x -> parent{foo = x} <$> 
    (\parent2 -> \y -> parent2{bar = y} <$> Const parent2.bar)
    parent.foo =
\parent -> \x -> parent{foo = x} <$> 
    (\parent2 -> \y -> Const parent2.bar) 
    parent.foo =
\parent -> \x -> parent{foo = x} <$> Const parent.foo.bar =
\parent -> Const parent.foo.bar

When using the Const functor, the lens is a getter! Can you guess what happens when the Identity functor is used? For reference, (<$>) fx (Identity x) = Identity (fx x), which is just normal function application after unwrapping the Identity constructor.

fooL..barL Identity =
\parent -> \x -> parent{foo = x} <$> 
    (\parent2 -> \y -> parent2{bar = y} <$> Identity parent2.bar) 
    parent.foo =
\parent -> \x -> parent{foo = x} <$> 
    (\parent2 -> Identity (\y -> parent2{bar = y} $ parent2.bar)) 
    parent.foo =
\parent -> \x -> parent{foo = x} <$> 
    (\parent2 -> Identity (parent2{bar = parent2.bar})) 
    parent.foo =
\parent -> \x -> parent{foo = x} <$> 
    Identity (parent.foo{bar = parent.foo.bar}) =
\parent -> Identity (\x -> parent{foo = x} $ 
    parent.foo{bar = parent.foo.bar})) =
\parent -> Identity $ parent{foo = parent.foo{bar = parent.foo.bar}} =
\parent -> Identity parent

Under the Identity functor, the lens take a Foo and returns an equal Foo by building one from the ground up.

So what if, instead of using just Identity as the focus conversion, we first run the focus through a function? I.E. the focus function is \val -> Identity (fun val) for some fun? I’ll spare the derivation and jump to the end: we get back the parent we put in except the focus will have the value returned from fun. Set fun = const newVal and you have a setter!

As a little aside, I can say personally that understanding how drastically the functor changes the behavior of the lens was a major hurdle for me. So many lens tutorials say that lenses “combine a getter and a setter” or something along those lines, and then I’d check the implementation and see no obvious getter or setter and wonder, “What kind of devilry is this?!”

If the functor controls the rebuilding done at the end of the lens conversion, then how is the functor selected? They are built into the implementations of view, set, and any of the numerous operators that can be used to run a lens conversion.

The gist, again

Lenses are tools for ripping something into constituent pieces, doing something with the final piece, then recombining all the pieces together into something new. At least that’s how the person behind this keyboard thinks about them now. There’s probably an even more general interpretation that describes all kinds of wonky things lenses can do beyond the usual getter, setter, identity, and similar behaviors, but this covers the most common uses pretty well. I’ll save that more general discover for another day after my cognitive burrito appetite returns.

Exploring the MVI architecture with Purescript Puzzler

Purescript Puzzler is a simple puzzle game using Tetris-like shapes that I created for the sole purpose of

  • Practicing purescript generally.
  • Trying out the purescript libraries virtual-dom and signal.
  • Exploring FRP and the Model-View-Intent style of application architecture.
  • Feel out the workings of possible wrapper libraries to make the process easier.

The game is playable on github, but as configured is pretty difficult to solve, so I recommend using the Hint button liberally to adjust the game’s difficulty level to your tastes.

Below is a collection of my impressions of the experience in making this game. My goal here is not to argue for or against any of these libraries or techniques but simply to write my ideas down while they are still fresh in my head and invite discussion.

Approach Overview

Before talking about my impressions, I’ll briefly describe the design of the game from a high-level viewpoint.

The easiest place to start is with the View. The View accepts the entire game state as an argument and produces a VTree representing the desired DOM state used for display. The View itself has no internal state aside from some stateful operations that can be performed on the DOM when the VTree is actually rendered. Also passed as an argument to the View is a Channel from the signal library. The Channel is used in event handlers to send lightweight messages to the Intent that descibe the user’s interaction. For example, when the user selects a piece to place on the board, the View sends a PieceClicked Piece message on the Channel to describe the event (what happened and what it happened to).

The Intent’s purpose, according to the MVI blog post linked above, is to translate user input events into Model events. In my implementation, this was really simple and there was essentially a 1-to-1 correspondence between my ViewEvents and my GameUpdate events, which seems like a code smell.

The Model contains all the game’s state GameState. This includes both the “domain model” state as well as any GUI related state. The Model also provides an update function that consumes GameUpdate messages and returns updated GameState.

The individual components are wired together in Main. A Channel is created for communicating ViewEvents. The Channel is subscribed to to produce a Signal ViewEvent. This is fed to the Intent, which produces Signal [GameUpdates], which are folded over with the Model’s state update function to produce Signal GameState. This signal is then fed into the View to create a Signal VTree, which is rendered with an effectful rendering function.

The Intent produces a Signal [GameState] instead of Signal GameState because I figured, in the general case, a single event on the View might trigger multiple updates in the Model, but in that wasn’t the case in this game.

Signal library

The signal library has some quirks, but overall it’s really nice. It’s essentially a clone of Elm, which has been exploring the concept of FRP related GUIs for a long time, so a lot of the kinks have been worked out.

Signals defined for all time

Signals are defined for all points in time, including time zero. Signals of “events,” therefore, aren’t so much discrete events in the usual sense. Instead, they represent the most recent event to happen. A consequence of this is that signals require initial state. There’s some discussion already here.

This formulation occasionally presented me with pain points when using signals. For instance, in order to get notifications of DOM events, I needed to put a Channel in my event handlers. In most cases, this isn’t a problem, but consider events that fire rapidly like drag events (drag and drop was my first approach for Purescript Puzzler, which I abandoned after great difficulty). Usually I won’t want to update the model on every drag event, so I can use sampleOn (every 40) at the subscription site so that drag events are limited firing at a 40 ms rate. But wait…what if dragging stops? No new events are put on the channel, but I’m still sampling the most recent event at 40 ms! Gah! A similar situation as this caused a nasty bug in which a “toggle” event kept firing, causing a div border to flash at 80 ms period. I worked around this by combining my sampling with distinct' to eliminate samples that didn’t change, but it does show that constant-time signals can be tricky to think about.

Another nit is that a Channel must be initialized with some value for time zero, but if a channel is being used to send events, how do I initialize when no events have happened yet? I had to create a dummy event called Init, that did absolutely nothing and had no significance, just to give the channel some kind of value. It’s possible that with some smarter designing, I could order the MVI components in such a way that the initial value to start the chain is the initial GameState, eliminating the need for Init, but it is not obvious to me whether that would work out.

Trickiness with effectful Signals

I had a lot of problems trying to figure out a way to process signals in an effectful way that also incorporated state. Specifically, I wanted my render function to add the “first” VTree to the DOM and after that patch the DOM with the diff between previous and current VTrees. However, I couldn’t figure out a way to use the signal combinators to achieve this. Instead, I had to provide an initial, dummy VTree, render it, then use the rendered node and the previous VTree as internal state that I folded over with new VTrees.

Signal distinction

Even though I got bit by the rapid sampling problem I mentioned above, it was pretty easy to fix once I understood it. The ability to apply distinct' for reference equality or distinct for value equality is pretty awesome, and underscores how much power can be packed into a small set of well-designed combinators. It is something the developer needs to think about, however. For instance, typically I used the distinct' variant out of habit, but in doing so I had to do things like

myFunc state = 
  case state.value of
    Nothing -> state
    Just v -> state {value = Nothing}

Functionally speaking, the two lines have the same result: a state with value set to Nothing, but in the first case, the result is referentially the same as the input, but in the second case it’s not; a new state will be built and returned. I think it the future, it would probably be better to simply use the value equality variant of distinct and only bother with the referential version if it was required. However, the value variant requires an Eq typeclass, so I can’t use them on type synonyms (as of now). I use type synonyms for records pretty liberally, so actually I’m not sure it would even work with the above code.

(I’d love to have view patterns to simplify code for cases such as above.)

Interactions “set in stone”

Once a signal line is established, I don’t think there is any way to “unsubscribe” from signal line updates. Any signal sent through a function will be called when that signal updates, so the function itself needs to handle its own logic for listening to or ignoring the updated values.

It’s also not clear to me how I would listen to multiple signals on the fly, adding new signals as needed. I expect it to be possible; I just don’t have any experience with it and feel like it could be a pain point.

Virtual DOM

Overall, virtual-dom is really cool to use. Writing a declarative GUI without having to worry about update-this or change-color-that was a straightforward, easy experience. I never have to worry about keeping the GUI and game state in sync because I’m building the GUI from scratch at each update. A cool side effect of this is that I can save my Model state at any time, then load it up and instantly see exactly what I was looking at when I saved. A stateless GUI makes reasoning about the display really straightforward.

For small projects, I wouldn’t hesitate to use virtual-dom again. However, for more complex ones, I have some concerns.

Room for VDOM wrapper libraries

The virtual-dom bindings for purescript are pretty low level, and that’s the way I think they should be. In JS land, the virtual-hyperscript DSL can be use to easily set up VTrees and includes a lot of convenient features out of the box, but it is opinionated. I’d love to see a similar purescript library and will probably make one sometime in the future.

One thing I want to avoid, however, is over-generalizing by writing a virtual-dom interpreter for a general DOM declaration language. Doing so might make common use cases easy but virtual-dom specific cases hard.

Stateless GUI is a double-edged sword

Not worrying about GUI state is a huge relief on the GUI side, but that means that every single stateful component in the application is now included in the Model – open dialogs, mouse location clicks, you name it. Purescript Puzzler is pretty simple in both the model and the GUI, so this is manageable. However, I can’t help but feel that in the general case, this actually couples the Model to the GUI more instead of less. Now the Model needs to know about all the little components on the GUI side in order to capture their state. This kind of formulation does not lend itself well to composition or separation of concerns.

Along the same lines, one thing I’m confused about in the MVI style is the purpose of Intent. All mine did was act as a message translator, but I think it might make sense to capture some state in Intent. One use case might be to evaluate the sequence of users actions before translating them for the Model.

As an example, imagine a text-based adventure game in which the user can move around like this:

$ move west 50 yards

This can be represented in a single Model event very easily, but what if this were a GUI? Let’s say the user clicks the Move button, then clicks West, then types in 50, chooses yards, then hits enter. While cumbersome, a GUI like this should be possible. Including some internal state in the Intent component would allow each input event to be collected into a single message to be sent to the Model. However, because there are no Model updates after each input event, there is no feedback that the user did anything! There’s not a straightforward solution, which is why the MVI blog post claims this is still an open problem.

Animations are inherently stateful

Transitions and animations are part of the polish in a really nice UI experience, but they are inherently stateful. All of that state (position, orientation, size, alpha, etc.) needs to be captured in the Model, needlessly complicating it.

One away around this is to use virtual-dom hooks to change node properties on “nextTick”. The change in properties will trigger a CSS transition, which will handle all the animation state behind the scenes. I haven’t tried either of these approaches, so I can’t comment on them extensively, but it definitely feels right to keep a bunch of pointless GUI state out of the Model.

Full VTree diff each update

If I understand the internals of virtual-dom correctly, the entire VTree is diffed and patched at each update. Typically, only a small part of the tree will change, but the whole tree is diffed all the same. There are some implemented shortcuts for reference equality of nodes, but in straight-forward functional style, the entire VTree will be rebuilt from scratch without any kind of caching, so reference equality will never hold. I wonder what the performance limit on this strategy is – how big can the VTree be and how fast can it be updated before this is a problem?

Virtual-dom uses Javascript conventions

Virtual-dom uses a number of JS style conventions that present some impedance when trying to use them from Purescript. The biggest is probably the use of arbitrary records that define id, attributes, style, etc. These are pretty verbose and annoying. In fact, most of the work done by the virtual-hyperscript DSL is simply building these records for the user in an easier way. However, in Purscript, each record is technically a different type, which doesn’t always jive well with the type system.

Another JS convention is the use of undefined to remove properties from nodes. This only affected me in one case in which I needed to disable/enable the Hint button. To disable/enable, I use the following attributes.

{ attributes: { disable: "" } } 
-- presence of disable attribute disables button, regardless of value
{ attributes: {} }              
-- absence of disable attribute enables button

The problem is that the above two records have different types, so I cannot return one or the other from an if clause. Instead, what I did is use FFI to create def and undef variables, and assigned disabled with one or the other as appropriate. An alternative would be to return entirely different VTrees from the if/else clause instead of trying to select only their options.

Overall

Building Purescript Puzzler was a great learning experience, especially since I’m not the most experienced web dev. I sunk my teeth into a few cool libraries and got my first real taste of FRP outside of toy examples. However, I still feel like thar be dragons lurking in the shadows with this approach, and the apparent lack of complex examples is not reassuring. I think part of the problem with this is the absence of wrapper libraries that make common tasks easier, which inhibits exploration. Another open problem is handling of complex GUI state within the Model. I’m also concerned with integrating foreign GUI components (“widgets” in virtual-dom parlance) and persisting state across them.

The approach does, however, eliminate sync issues between the components, which naturally eliminates a large source of bugs.

Why Purescript?

One thing that I feel Haskell doesn’t do well presently is interface with GUI libraries. One issue is that, because most such libraries are largely stateful, there’s some impedance when trying to adopt them into idiomatic Haskell code. Another problem altogether is trying to get cross-platform GUI libraries to even build/run. It’s a problem I’ve written about before.

I’ve had some good success in the past with using Haskell libraries that leverage the browser as a robust, cross-platform GUI. However, running the GUI in the browser and the controller logic in Haskell is problematic for all but the simplest GUIs for a few reasons:

  1. The round trip communication between the browser and Haskell code introduces latency that might be unacceptably high. Indeed, some typical operations might require several round trips.
  2. More and more, the latest GUI component libraries are written in Javascript, so using GUI components that are designed with Javascript in mind is more difficult with a Haskell backend.
  3. Keeping the GUI in sync with the model requires fragile DOM updates. Smarter, more functional and performant approaches like virtual-dom don’t integrate well with Haskell backends because the entire model or virtual DOM tree must be serialized to the browser for each GUI update.
  4. More and more, browser technologies are becoming the basis for cross-platform apps.

But here’s the thing: writing Javascript is no fun. Haskell is fun. Can we write Haskell but get the advantages of Javascript?

Haskell to Javascript Compilers

Write Haskell. Compile to Javascript. Run anywhere. Sounds good, right? Some projects are developing exactly this kind of solution. Each has its advantages. For example, Fay has a nice FFI to bind to Javascript libraries and invoke custom Javascript code. Haste reportedly generates fast, understandable Javascript. GHCJS supposedly compiles any Haskell code with ease.

However, I think all these solutions suffer from a key deficiency: Haskell baggage. Each compiles Haskell syntax and supports Haskell semantics, including laziness. Usually, this necessitates a large Javascript runtime be packaged with the generated Javascript program just to execute it in a way Haskell would. After all, they are the forcing square peg of Javascript into the round hole of Haskell.

Purescript – A Different Approach

Purescript is a Haskell-like language that compiles to Javascript. Unlike the above approaches that accommodate all/most of Haskell’s syntax and features, Purescript is a functional language designed from the ground up to target Javascript, and its syntax is close enough to Haskell that it should be easy for any Haskeller to pick up quickly. It features:

  1. No burdensome runtime.
  2. Strict, Javascript-like evaluation.
  3. Support for Javascript object literal notation.
  4. A type system that is arguably more powerful and/or more convenient than Haskell’s.
  5. A dead simple FFI that makes Javascript library interop relatively painless.
  6. Other cool goodies.

In a future post, I’ll explore these advantages more in depth, but here I wanted to describe what might motivate a Haskeller (or anyone) to give Purescript a try.

Haskell desktop GUIs with bindings-cef3

While web technologies and apps “in the cloud” are easily the dominant trend in application programming these days, there are still some situations in which reliable old desktop apps are superior. For example, most of my experience is in the defense industry, and there is no way the cloud would get trusted with sensitive files without appropriate protections. So how can we leverage the efforts and progress of web interface programming on the desktop, especially with regard to Haskell?

One option that I have some experience with is threepenny-gui, which uses the web browser as an interface to a Haskell backend server that runs locally (or over a LAN – really any low latency situation). An early version of threepenny is used in FNIStash. While effective, something just feels wrong to me about running desktop applications inside a browser application. Really what I’d like to do is incorporate browser functionality inside my applications instead of relying on Google, Mozilla, or even Microsoft.

Enter the Chromium Embedded Framework. It’s a fully functioning, bare-bones browser and javascript engine packed inside a .dll or .so file. Add some tabs, a URL bar, bookmarks, etc, and you have a modern browser. Alternatively, you can use CEF to provide HTML and JS driven GUIs for desktop applications. Indeed, the Steam client does this very thing! Adobe uses it as well. In fact, it’s pretty popular.

CEF provides a C API, which we can call from Haskell with appropriate bindings. I cut my teeth recently with the bindings-dsl by defining the bindings to the low level interface of the HDF5 library. Bindings to the CEF library seemed like a good follow on activity, especially since I’d like to use it in my own Haskell projects.

So I created bindings-cef3, Haskell bindings for the CEF3 C API. The package includes an optional example program that creates a browser window and loads a URL. There’s a snapshot below. These bindings are very low level, so there is ample opportunity to wrap them in a smarter, more convenient Haskell API. This is something I plan to do myself eventually, unless a more experienced Haskeller beats me to it!

Beware that because of the multiple interdependent types in CEF3, nearly all of the bindings are provided in a single file. It can take a while to preprocess and compile. When I was working on it, I had up up the RAM on my virtual machine from 4 GB to around 5 GB to avoid cryptic gcc errors. If anyone knows a better way to structure the library to avoid these hurdles, I’d love to hear it.

The library is not currently on Hackage as of this writing, and that is intentional. The current version only supports Linux, and being an occasional Windows Haskell developer myself, I don’t like the idea of keeping out Windows (and MacOS) users. Only a little more coding effort and a decent amount of testing effort is required for other platforms, and I welcome contributions from anyone wanting to help. Once it has been vetted a little more and better compatibility is implemented, joining Hackage with other bindings library seems only natural.

While bindings to CEF3 is just a first step toward having “true” Haskell desktop GUIs driven by web technologies, it’s an important step. More experimentation is needed to uncover quirks and limitations; I’m certainly no CEF expert. In fact, I probably know only as much as is necessary to get the example application working 🙂 . Hopefully this library will help out anyone frustrated with Haskell GUIs like I have been before!

Screenshot of cefcapi example program.

]8 Screenshot of cefcapi example program.

FNIStash r1.5 released!

I put up a new version of FNIStash today. There aren’t any new features, but successfully recognizing items in the shared stash without any error has been dramatically improved. My wife and I have been using this version for a while and only rarely, rarely come across an item FNIStash has problems handling. In fact, the only item I know of right now that has a problem is Landchewer…

If you’ve been holding off on trying out FNIStash because it wasn’t reliable, I think you’ll be a lot happier with r1.5 than previous releases.

Remember, if you have a question or problem, don’t be afraid to contact me or leave a comment! I like to think I’m pretty responsive.

Setting Up a Haskell Project on NixOS

This entry is part 6 of 6 in the series Setting Up Haskell Development on NixOS Linux from Scratch

Previously, we looked at how to add new packages to our nixpkgs expression tree. Often, the reason we are adding new packages is that we want to use them for Haskell development! This installment will explore starting a new Haskell project.

Again, we’re going to be using some custom nix commands that we set up in previous posts of this series, so if you’re jumping in here, you might want to back up a few installments if you find yourself getting lost.

I’m going to be using the janrain snap tutorial as the basis for this installment, but much of this exploration is getting set up to do the tutorial, so there is not much overlap.

Set Up Project Files

First, let’s set up the basic project files we’re going to be using for our exploration.

Basic Snap Setup

Run the following commands to set up a new projectomatic directory and initialize it using cabal init and snap init. For the cabal init call, you can accept all the defaults if you want; most of the files generated with that call will be overwritten by snap init anyway. When asked, you want to choose 2) Executable.

#!bash
mkdir projectomatic
cd projectomatic
cabal init
snap init

If you encounter a snap: command not found message, then you need to install snap into your user environment. If you already have the package, installing it will just make it active for the user environment so you can call snap init. Otherwise, installing will both build it and make it active.

#!bash
nix-install haskellPackages.snap

The project directory will be initialized with a projectomatic.cabal file, among others. Feel free to modify the values set by default in the cabal file. I’m going to leave the defaults as is for this tutorial.

Sanity Check: In your projectomatic directory, you should now have projectomatic.cabal, Setup.hs, and the directories log, snaplets, src, and static.

Generate default.nix

Just like we used the cabal2nix utility to automatically generate nix expression for hackage packages, we can also use cabal2nix to generate expressions for our new projectomatic project.

#!bash
cabal2nix projectomatic.cabal --sha256 blah > default.nix

Check out the new default.nix and you’ll see a nice, clean expression for the new projectomatic package. We want to change the sha256 = "blah" to src = ./., but other than that, the expression is similar to the ones we saw previously.

We can’t run it just yet, though. This expression is generated so that it can be integrated into the haskellPackages environment of nixpkgs. Since our project will be distinct from haskellPackages, we need to do some additional customization.

The first issue is with the expression inputs:

#!nix
{ cabal, heist, lens, MonadCatchIOTransformers, mtl, snap, snapCore
, snapLoaderStatic, snapServer, text, time, xmlhtml
}:

This looks just like the previous nix expressions we encountered, so what’s the problem? When we incorporated new nix expressions into the nixpkgs expression tree, expressions for dependent Haskell packages were defined in the same haskellPackages scope. Thus, when Nix needed the input cabal expression in order to put the cabal dependency on the path, it could do it because the cabal expression was in the same scope.

On the other hand, here we are defining a nix expression outside of that scope, so Nix doesn’t know what the cabal dependency means. In fact, if we try to run nix-build for projectomatic, we’ll see this:

#!bash
[dan@nixos:~/Code/projectomatic]$ nix-build
error: cannot auto-call a function that has an argument without a default value (`cabal')

To fix this problem, we need to specify in our default.nix expression where the dependent expressions are defined. We’ll do this by redefining the expression to take a single haskellPackages input argument that has a default value defined as (import <nixpkgs> {}).haskellPackages), which is the scope we want!

#!nix
{ haskellPackages ? (import <nixpkgs> {}).haskellPackages }:
let 
  inherit (haskellPackages) cabal heist lens MonadCatchIOTransformers mtl snap snapCore
  snapLoaderStatic snapServer text teim xmlhtml
  ;

in cabal.mkDerivation (self: {

The term <nixpkgs> instructs Nix to look for expressions beginning with $NIX_PATH/nixpkgs. Since my NIX_PATH has only the prefix that I set in my .bashrc file, the resolved file path is my desired local directory /home/dan/Code/nixpkgs.

#!bash
[dan@nixos:~/Code/projectomatic]$ echo $NIX_PATH
/home/dan/Code:nixos-config=/etc/nixos/configuration.nix

Using nix-shell

Now we have all the files we need for a complete (but minimal) snap default project. A lot of our effort was spent tweaking the new default.nix to work with our new project. Surely there must be some way to check that it’s correct.

A Quick Reminder about Expressions

Remember the purpose of nix expressions.

  1. Define all system inputs to a package
  2. Define the build steps for the package

When a nix expression is run, Nix configures something of a private system for building the package. The private system is configured to only have the dependencies of the nix expression. If a required dependency is left out of the expression inputs, the package will fail to build.

nix-shell Command

The nix-shell command acts as a way to inject a CLI into this private system. Within the nix-shell, the user can build expressions and run commands as if they are being run as part of an expression. Let’s try it out

#!bash
[dan@nixos:~/Code/projectomatic]$ nix-shell
error: Package ‘projectomatic-0.1’ in ‘/home/dan/Code/projectomatic/default.nix:18’ has an unfree license, refusing to evaluate. You can set
  { nixpkgs.config.allowUnfree = true; }
in configuration.nix to override this. If you use Nix standalone, you can add
  { allowUnfree = true; }
to ~/.nixpkgs/config.nix.

Whoa, what happened here? By default, Nix won’t evaluate expressions that have an unfree license, which, if you accepted all the defaults like I did, is what we have for our project. By following the instructions given in the error, we can allow unfree packages to be built. However, this will allow unfree packages everywhere, and we just want to build this one unfree package.

An unmentioned way to enable unfree packages is the NIXPKGS_ALLOW_UNFREE environment variable. We can temporarily enable unfree packages, build the one we want, and then disable it again to return us back to our starting point. I added this to my .bashrc file (along with nix-install and nix-search) to make it easy to drop into an unfree nix-shell.

#!bash
nix-shell-unfree() {
  FLAGSAVE=$NIXPKGS_ALLOW_UNFREE;
  echo "Opening shell with NIXPKGS_ALLOW_UNFREE=1. Original setting of $FLAGSAVE will restored on exit.";
  export NIXPKGS_ALLOW_UNFREE=1;
  nix-shell;
  echo "Restoring NIXPKGS_ALLOW_UNFREE=$FLAGSAVE ...";
  export NIXPKGS_ALLOW_UNFREE=$FLAGSAVE;
}

Now our nix-shell-unfree command will put us in a nix shell.

#!bash
[dan@nixos:~/Code/projectomatic]$ nix-shell-unfree
Opening shell with NIXPKGS_ALLOW_UNFREE=1.  Original setting of 0 will restored on exit

[nix-shell:~/Code/projectomatic]$ exit
exit
Restoring NIXPKGS_ALLOW_UNFREE=0 ...

Try entering a nix-shell-unfree and running nix-build. Did the build work without error? Depending on your dependency versions, maybe it did. For me, I get the following:

#!bash
Setup: At least the following dependencies are missing:
lens >=3.7.6 && <4.2

Looks like I still have some work to do. At first, I started setting up a new local expression for a different lens version, but after getting it set up, I found that snap requires lens 4.2, even though the cabal file written by by snap init requires less than 4.2! I am chalking this up to a bug and manually edited the projectomatic.cabal file to use lens <= 4.2. After that, nix-build works without issue. Note that I also tried keeping the cabal file unmodified and using jailbreak=true, but that had no effect as far as I could tell.

Running the Default Application

We have successfully overcome several obstacles in getting the default, (mostly) unmodified snap project template to compile. Now let’s run it.

When using nix-build, Nix puts a sym link into your project directory called result that points to the location in the store that holds the build results of the expression. We can use result to get easy access to our new binary.

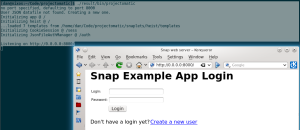
snap-app


TADA! We are now ready to actually follow the janrain tutorial. This installment is long enough already, so I’ll save exploring the tutorial itself for next time.

Adding Nix Expressions for New Packages

This entry is part 5 of 6 in the series Setting Up Haskell Development on NixOS Linux from Scratch

The nixpkgs repository does a good job of including many Haskell packages already. Indeed, it almost seems like the lazy, functional Nix-based NixOS might have a soft spot for Haskell :). Much of hackage is available with just a few keystrokes, relieving cabal of its package-managing tasks.

However, nixpkgs does not include all of hackage, and it’s actually not hard run into missing packages during development. For instance, not long ago I wanted to build a toy snap app as a first project in NixOS. While snap is available, snap-web-routes is not.

We’ll explore adding hackage packages to your local nixpkgs repo (and submitting them upstream) in this installment. In fact, we’re going to add snap-web-routes to nixpkgs.

Preparing git

If you followed my earlier installment in this series, you should have a local clone of the nixpkgs repository. Since we plan to submit a pull request with our changes, we need to take a few steps to prepare git. If you are pretty seasoned with git, you can probably skip this section.

Add and Sync Upstream

We need to add the primary NixOS/nixpkgs github repository to our remotes. This will enable us to pull in updates to the nix expressions easily.

#!bash
git remote add upstream https://github.com/NixOS/nixpkgs.git
git fetch upstream
git merge upstream/master

The last two lines are what we’ll execute whenever we want to pull in updates for our custom nix-search and nix-install calls.

Make a New Branch

Next we need to create a new branch for adding our new expression. This will isolate our updates when we submit a pull request; otherwise, any additional, unrelated updates we make to our local repository and push to origin will get added to the pull request! I learned this the hard way.

Make a new branch and check it out using checkout and -b.

#!bash
git checkout -b add-haskell-snap-web-routes

Adding Expressions

Nixpkgs Expression Hierarchy

The nix expressions for all the available package are included in our local nixpkgs repository. Each nix expression is specified using a path. If no file name is provided in the path, then the file name of default.nix is assumed. For example, nixpkgs/ has a default.nix, which has the following line

#!nix
import ./pkgs/top-level-all-packages.nix

The default.nix expression imports all the expressions listed in pkgs/top-level/all-packages.nix. This expression, in turn, imports expressions from other locations in the nixpkgs repository. The one we are interested in is pkgs/top-level/haskell-packages.nix. Here’s just one excerpt from the haskell-packages.nix file.

#!nix
snap = callPackage ../development/libraries/haskell/snap/snap.nix{}

So, when we invoke nix-install haskellPackages.snap, Nix calls the expression located at in the ../development/libraries/haskell/snap/snap.nix file. Thus, to add a new packages to our repo, we need to

  1. Write a nix expression file and put it in a logical spot in the nixpkgs repository.
  2. Put a line in haskell-packages.nix we can use to call the expression file.

A Nix Expression for a Cabal Package

To add snap-web-routes to the hierarchy, we need to write a nix expression for it. What does a nix expression look like? Here’s the one for snap given in the nix file mentioned above.

#!nix
{ cabal, aeson, attoparsec, cereal, clientsession, comonad
, configurator, directoryTree, dlist, errors, filepath, hashable
, heist, lens, logict, MonadCatchIOTransformers, mtl, mwcRandom
, pwstoreFast, regexPosix, snapCore, snapServer, stm, syb, text
, time, transformers, unorderedContainers, vector, vectorAlgorithms
, xmlhtml
}:

cabal.mkDerivation (self: {
  pname = "snap";
  version = "0.13.2.7";
  sha256 = "1vw8c48rb1clahm1yw951si9dv9mk0gfldxvk3jd7rvsfzg97s4z";
  isLibrary = true;
  isExecutable = true;
  buildDepends = [
    aeson attoparsec cereal clientsession comonad configurator
    directoryTree dlist errors filepath hashable heist lens logict
    MonadCatchIOTransformers mtl mwcRandom pwstoreFast regexPosix
    snapCore snapServer stm syb text time transformers
    unorderedContainers vector vectorAlgorithms xmlhtml
  ];
  jailbreak = true;
  patchPhase = ''
    sed -i -e 's|lens .*< 4.2|lens|' snap.cabal
  '';
  meta = {
    homepage = "https://snapframework.com/";
    description = "Top-level package for the Snap Web Framework";
    license = self.stdenv.lib.licenses.bsd3;
    platforms = self.ghc.meta.platforms;
  };
})

Whoa, that’s a lot to take in. Let’s go through the main points.

Dependencies List

The big list at the top are the dependencies for the nix expression. When Nix runs this expression, it first ensure that all dependencies are available and placed on the path. Anything not in the dependencies list is removed from the path. If a necessary dependency is not specified in this list, Nix will refuse to run the expression.

One thing to note about these dependencies: they look like Haskell package names, but technically they are nix expressions in the same namespace as the snap.nix expression. By convention, nix expressions for Hackage packages are named slightly differently.

Cabal.mkDerivation

The call to cabal.mkDerivation is a function call defined elsewhere in the expression hierarchy, and each item specified within the curly braces is a named input argument to the function. The important items are mostly self-explanatory, but a couple could use some elaboration:

  • sha256 – a hash of the source code used to build the package. Nix checks the hash for consistency before building the package.
  • jailbreak – strips out the dependency version bounds from the cabal file before building.

Generating a Nix Expression with cabal2nix

Specifying a nix expression like the one for snap from scratch would be a huge PITA. Thankfully, NixOS has a sweet utility function called cabal2nix that essentially handles everything for us.

#!bash
nix-install haskellPackages.cabal2nix

First, make sure your hackages list is up to date.

#!bash
cabal update

Next, call cabal2nix and specify the hackage package name.

#!bash
[dan@nixos:~/Code/nixpkgs]$ cabal2nix cabal://snap-web-routes
  % Total    % Received % Xferd  Average Speed   Time    Time     Time  Current
                                 Dload  Upload   Total   Spent    Left  Speed
  0     0    0     0    0     0      0      0 --:--:-- --:--:-- --:--:--     0
  0     0    0  7161    0     0  12992      0 --:--:-- --:--:-- --:--:-- 12992
path is ‘/nix/store/wyilc14fjal3mbhw0269qsr5r84c5iva-snap-web-routes-0.5.0.0.tar.gz’
{ cabal, heist, mtl, snap, snapCore, text, webRoutes, xmlhtml }:

cabal.mkDerivation (self: {
  pname = "snap-web-routes";
  version = "0.5.0.0";
  sha256 = "1ml0b759k2n9bd2x4akz4dfyk8ywnpgrdlcymng4vhjxbzngnniv";
  buildDepends = [ heist mtl snap snapCore text webRoutes xmlhtml ];
  meta = {
    homepage = "https://github.com/lukerandall/snap-web-routes";
    description = "Type safe URLs for Snap";
    license = self.stdenv.lib.licenses.bsd3;
    platforms = self.ghc.meta.platforms;
  };
})

Boom. We get a complete nix expression without doing any work. Now we just need to put it in the right spot in the hierarchy. The rest of the hackage packages are in pkgs/development/libraries/haskell, so we’ll follow suit.

#!bash
[dan@nixos:~/Code/nixpkgs]$ mkdir pkgs/development/libraries/haskell/snap-web-routes

[dan@nixos:~/Code/nixpkgs]$ cabal2nix cabal://snap-web-routes > pkgs/development/libraries/haskell/snap-web-routes/default.nix

Now we can check that our expression actually runs. The nix-install function we added isn’t smart enough to handle --dry-run, so we’ll use the nix-env command directly.

#!bash
[dan@nixos:~/Code/nixpkgs]$ nix-env -iA haskellPackages.snapWebRoutes --dry-run
installing `haskell-snap-web-routes-ghc7.6.3-0.5.0.0'
these derivations will be built:
  /nix/store/f42ybqmcmq44nr73l6ap90l5wnm3s4kq-haskell-snap-web-routes-ghc7.6.3-0.5.0.0.drv
these paths will be fetched (21.88 MiB download, 416.87 MiB unpacked):
  /nix/store/0kw75f2qqx19vznsckw41wcp8zplwnl7-haskell-errors-ghc7.6.3-1.4.7
  /nix/store/14rjz7iaa9a1q8mlg00pmdhwwn7ypd4x-haskell-distributive-ghc7.6.3-0.4.4
  /nix/store/1jnipx1swkivg1ci0y7szdljklaj9cx1-haskell-skein-ghc7.6.3-1.0.9
...

So snap-web-routes will be built, and all of its dependencies will be fetched from pre-built binaries. Sweet! If the dry-run looks good, you can run the command again without the --dry-run option or use nix-install like we have previously. I omit that call here.

Note that this will install the package to your user environment. Remember: installing a package means making it active in the user environment. If you don’t want to install it, you can just build it with nix-build, which will put it in your store but it won’t be installed for the user.

#!bash
nix-build -A haskellPackages.snapWebRoutes

Make the Pull Request

Again, if you’re already adept at git and github, you can skip this section. We’re going to push our changes up to github and make a pull request. The process is largely automatic! Add the new .nix file to the git repo, commit the changes, and then push the branch to github.

#!bash
git add pkgs/development/libraries/haskell/snap-web-routes/default.nix
git commit -a -m "Added snapWebRoutes to haskellPackages."
git push origin add-haskell-snap-web-routes

Go to your github repo and you should see a prompt asking if you want to create a pull request; something like NixOS:master -> fluffynukeit:add-haskell-snap-web-routes. Follow the prompts and you’re done!


That’s it for this installment! New installments to come if/when I encounter new problems to write about!

Setting Up Vim (for Haskell)

This entry is part 4 of 6 in the series Setting Up Haskell Development on NixOS Linux from Scratch

In this installment, we are going to set up vim for Haskell development.  If you don’t want to use vim, you can skip this post entirely.  On the other hand, if you do want to use vim or are at least curious about trying it out (like me), then keep reading.

Chances are, if you do any kind of programming in a unix-like environment, you already know that vim is a text editor.  Its proponents claim that proficiency in vim enables you to code faster than in any other editor.  As for myself, my programming experience is mostly in IDEs, so I’m a veritable vim newbie.  When I first started experimenting in vim not too long ago, I found the number of configuration options and plugins to be overwhelming.  In fact, I’ve had to scrap several earlier version of this post as I found new combinations to try!  So, this post will explore just one possible vim configuration for Haskell development, and to be honest it’s one with which I have limited experience so far.  Still, I expect the baseline discussed here to be a good starting point for pretty much anybody.

As time goes on, I will likely change my vim configuration to better suit my needs as I discover them.  I plan to keep my vim configuration version controlled, so if you are curious about the latest version you can check it out. Also, this post is not a tutorial about how to use vim, but rather how to configure it for Haskell.  If you want practice with basic vim controls, you might want to try out the free levels of vim-adventures.

General Vim Options

Vim configuration is controlled through a the ~/.vimrc file.  This file is processed when vim first starts up and allows the user to configure vim in a huge number of ways.  Just wrapping your head around all the various options can be overwhelming.  Configuring vim means building this vimrc file to our liking.

Installing Vundle for Managing Plugins

One of the things that makes vim a popular editor choice is huge number of plugins available to customize your text editing experience.  Downloading plugins is easy, but to get vim to recognize your plugins, you have to mess with vim’s runtimepath variable.  This can get pretty tedious, but thankfully there are plugin managers that will do the work for us.  Vundle is one such declarative plugin manager, which fits with our NixOS theme.

Installing Vundle is a breeze.  First, execute the following command:

#!bash
git clone https://github.com/gmarik/Vundle.vim.git ~/.vim/bundle/Vundle.vim

This will make a bundle directory under which we will install our various plugins.  We’re not done yet, though.  We also need to add the following to the top of our .vimrc file to run Vundle at startup.  The comments are mine and optional

#!vim
" ========= VUNDLE CONFIG ===========
set nocompatible
filetype off
set rtp+=~/.vim/bundle/Vundle.vim
call vundle#begin()
Plugin 'gmarik/Vundle.vim'

" LIST PLUGINS HERE

" VUNDLE CLEANUP    
call vundle#end()
filetype plugin indent on

Essentially, this code is declaring that the Vundle plugin will manage itself. One downside of Vundle, however, is that the plugins must have a github repository to be managed.  If this is a problem for you, check out the alternative pathogen.

Installing General Utility Plugins

Next, we’ll install some utility plugins for vim, which will also demonstrate how to install plugins using Vundle generally.  The plugins I’m choosing are vim-sensible, vim-unimpaired, and syntastic.  Vim-sensible touts itself as being a standard set of defaults on which pretty much everyone can agree.  Vim-unimpaired adds lots of key bindings to make tasks like navigating through compiler errors, for example, a lot easier.  Syntastic runs syntax checkers and displays the errors in plain view. Simply add the following lines to the .vimrc file in the section I labeled LIST PLUGINS HERE.

#!vim
" LIST PLUGINS HERE
Plugin 'tpope/vim-unimpaired'
Plugin 'tpope/vim-sensible'
Plugin 'scrooloose/syntastic'
let g:syntastic_always_populate_loc_list=1
" A Haskell plugin we'll install later is 'dag/vim2hs',
" but installing it now is fine, too.

Save the file, (re)load vim, and enter :PluginInstall.  Vundle will set up the path to only use the plugins you’ve declared in .vimrc, kind of like NixOS does!  Cool.  A split screen should show up indicating the status of the selected plugins. If you ever want to add or remove plugins, just change the listed plugins in the .vimrc file and run :PluginInstall again.

The line let g:syntastic_always_populate_loc_list=1 configures syntastic to put the errors in the vim locations list, which allows us to jump through the errors using the vim-unimpaired bindings of [L, ]L, [l, and ]l.

Adding Custom Options Directly

The above plugins do a good job of setting up some standard options, but everyone prefers their own twist on things.  Mine is given below, which I put in my .vimrc file after the Vundle settings.  Each setting is commented to explain what’s going on.

#!vim
" ========== GENERAL VIM SETTINGS ==========
" Enable search highlighting
set hlsearch
" Enable line numbers
set number
" Use F11 to toggle between paste and nopaste
set pastetoggle=<F11>

" vim-sensible enables smarttab. Here, we configure the rest:
" Set the display size of \t characters
set tabstop=2
" When hitting , insert combination of \t and spaces for this width.
" This combination is deleted as if it were 1 \t when using backspace.
set softtabstop=2
" Set code-shifting width. Since smarttab is enabled, this is also the tab
" insert size for the beginning of a line.
set shiftwidth=2
" When inserting tab characters, use spaces instead
set expandtab

" Instead of failing command, present dialog if unsaved changes
set confirm

" Enable mouse in all modes
set mouse=a

" Map jk and kj to  to exit insert mode. We need to use F11 to toggle to
" paste mode before pasting any string with jk or kj, then switch back. When
" inserting jk or kj manually, we will need to type the keys slowly so that
" the key mapping times out. Using jk or kj to escape is easier than many
" other alternatives.
ino jk <Esc>
ino kj <Esc>

" Set a vertical line for long line width. This will give us a visual
" indicator for cases in which line length is approaching 80 chars
set colorcolumn=80
" Set the command section height to 2 lines.  Useful if notices (like syntastic) are shown on command lines
set cmdheight=2

Customizations for Haskell

Now we’ll add some new features for our vim installation specifically to work with Haskell.

ghcmod

Installing the syntastic plugin for syntax checking was only part of the story as syntastic only runs external syntax checkers and displays their results. So now we need a syntax checker. Enter ghcmod.

#!bash
nix-install haskellPackages.ghcMod

That’s it. Syntastic will recognize that ghcmod is installed and run it whenever a Haskell file is saved. To verify that it’s being recognized, open a Haskell file, type some Haskell code, then run :SyntasticInfo, which will show what checkers syntastic plans to use for the file. You can also run the checkers explicitly with :SyntasticCheck.

vim2hs

vim2hs is a vim plugin for Haskell syntax highlighting and linting, among other things.  It seems more lightweight than the haskellmode-vim alternative plugin and was highly recommended in a reddit discussion about vim and Haskell.  Let’s give it shot.

#!vim
Plugin 'dag/vim2hs'

Remember to re-run :PluginInstall within vim after updating .vimrc.


That’s it for the basic vim setup. Changing the color scheme, customizing the display, and other items related more toward personal taste are left for you to explore!

Installing Essential Software In NixOS

This entry is part 3 of 6 in the series Setting Up Haskell Development on NixOS Linux from Scratch

Welcome to part 3 of my series on setting up NixOS for Haskell development!  In this part, we’ll learn how to discover and install essential software for NixOS.  We won’t cover the particulars of installing Haskell-related components (I’m saving that for a post on its own), but some of our decisions here will be motivated by the foresight that Haskell development is what we eventually want to do.  As always, if you see an error, please let me know.  I’m figuring this stuff out as I go.

In the last post, we learned a bit about the Nix package manager.  Let’s recap the essential points:

  • All software components in NixOS are installed using the Nix package manager.
  • Packages in Nix are defined using the nix language to create nix expressions.
  • Nix expressions define all inputs to a build process, including dependencies, which can themselves be nix expressions.
  • Nix will build all required dependencies if they do not already exist on your system.
  • Packages installed for all users are defined in the nix expression /etc/nixos/configuration.nix

The rest of this post will focus on how to install packages into your user environment.  These are the packages that are active on a per-user basis, so other users won’t necessarily have the same active packages as you do.

Finding and Installing Packages

Packages are installed by running Nix expressions, so how do we find Nix expressions?  There are actually a few different ways to get them.

  • Use the nix expressions that are included with your installation of NixOS, which are part of a nix channel.  A nix channel allows you to easily download updated expressions as well as pre-compiled binaries.
  • Download a set of nix expressions from the internet.
  • Subscribe to a new nix channel to download more up-to-date software packages than are available in the default channel.

Let’s explore each one of these in turn.  Spoiler alert: we’ll use 1) early on but most of our time will be spent with 2).  I’ll touch on 3), but honestly it’s not something I recommend if you’re doing Haskell development because I don’t think it offers much, if anything, over option 2).

Expressions Available through NixOS Installation

Your NixOS installation comes with a set of packages that are included by default.  These are installed in /nix/var/nix/profiles/per-user/root/channels/nixos, but NixOS is kind enough to give you a shortcut via ~/.nix-defexpr/channels_root/nixos.  This is the default location from which nix expressions are run.  It also happens to be a nix channel, but I’ll discuss nix channels later.  The key point is that NixOS comes with oodles of expressions built-in and ready to be run.  In fact, let’s run one right now in preparation for later steps.  We’ll install git. All of the manipulations of the user environment are invoked using the nix-env command. For example, if we want to see a list of all available packages from the built-in expressions

#!bash
nix-env -qaP --description *

Here, q means query, a means available packages, and P means show the attribute path, which is essentially a way to specify a particular expression instead of using the software package name.  The description option includes the description of the packages, as well.  In the case of git, we’ll see this among the long list of available packages:

#!bash
nixos.pkgs.gitAndTools.gitFull  git-1.9.4  Git, a popular distributed version control system

The software is named git-1.9.4, but the attribute path specifying the nix expression used to build it is nixos.pkgs.gitAndTools.gitFull.  We can use either the package name or the attribute path to install git, but the attribute path is the recommended strategy since it removes all ambiguity about which package should be installed and how. 

So let’s install git using the following command:

#!bash
nix-env -iA nixos.pkgs.gitAndTools.gitFull

Nix will then download all dependencies that you don’t already have (which, since this is our first installation, is all of them) and install git.  Here the flag i means install and A means by attribute path (yes, it bothers me that query commands use -P and install commands use -A).  We can verify the installation worked successfully by querying the list of installed packages in the user environment.

#!bash
nix-env -q --installed

The command above should list git as being an installed package.

Installing from Downloaded Expressions

Another approach to getting expressions is to download a collection of them from the internet.  The most popular collection is the nixpkgs repository on github.  In fact, the nix expressions that are bundled with NixOS (and which we explored above) are simply a stable version of this nixpkgs repository.

While the nixpkgs repository has a lot of available Haskell packages already, I quickly ran into ones that I needed but weren’t included.  Properly installing these packages requires adding new nix expressions to the available set.  This is why I recommend running downloaded nix expressions as the default method of installation for Haskell developers; most likely, you’ll be adding and running your own expressions anyway, and you can pull in updates with git just as easily as you can using nix channels.

Since Nix is declarative, our expressions will be useful for everyone else, too, so why not contribute them back to nixpkgs?  For this, we’ll need to fork the nixpkgs repository and then clone our fork to our local machine.  Any updates made locally can be made on a branch, pushed back to github, and then pulled into the main nixpkgs repository. FYI: when I cloned the repository, it was about 125 MB in size.

After you fork and clone the repo locally, cd to its root.  We’re going to run pretty much the same nix-env command we did before, except now we use the -f flag to read the nix expressions from the directory.  Personally, I’m trying to get good at vim, so I’ll be querying for it with the following:

#!bash
nix-env -f . -qaP --description vim
vim  vim-7.4.316  The most popular clone of the VI editor

Pretty easy.  In this case, I got lucky and was able to guess the package name “vim” correctly, but in general there are better ways to search, as we’ll find later. Installation is also an analogous command.

#!bash
nix-env -f . -iA vim

We’ll investigate how to update this local nixpkgs repository with our own additions in a future post.

Subscribing to a New Channel

The third option for getting expressions is to subscribe to a new channel.  I say new channel because all NixOS installations are automatically subscribed to the channel associated with the released OS version.  For instance, I can inspect the default channel’s manifest and see that it’s for NixOS version 14.04.

#!bash
cat ~/.nix-defexpr/channels_root/manifest.nix 
[ { meta = { }; name = "nixos-14.04.312.b84584f"; .......

Ok, but what is a channel?  A channel is a set of nix expressions combined with a manifest file.  The manifest file describes what binaries are available for downloading instead of building from scratch, so they can save you a lot of time if you are doing many installations. 

You can pull in new updates from a channel using the nix-channel --update command. The default channel is not really sufficient for development purposes because we want to add and run our own nix expressions.  As such, I’m glossing over channels in favor of pulling updates in from the git repository directly.  I admit I’m not the most knowledgeable about channels, so if there some best practices out there to make working with them easier, please let me know.

Enhancing the Nix Experience

We have seen how to query and install packages using Nix, but there are some small customizations we can make to make our development lives a bit easier.  Instead of using nix-env and specifying our standard set of flags again and again, we can write some custom bash commands to do most of the typing for us. One problem: how can we search for packages by keyword?  The nix-env command takes a package name as an input, not a general keyword. Thankfully, we have grep, which can search through the large list of available packages and find keywords and regular expressions for us. The code below defines a new bash command nix-search that will search through all the expressions in our git repository looking for matches of a particular keyword or regular expression.  Searching for the right expression to install will be much easier.

#!bash
nix-search(){ echo "Searching..."; nix-env -f ~/Code/nixpkgs -qaP --description \* | grep -i "$1"; }

All this hard-coding of -f ~/Code/nixpkgs is a problem waiting to happen, though. A better way is to use the .nix-defexpr folder to simply change the default location that Nix searches for expressions. In doing so, we won’t even need the -f flag anymore.

One thing I’d like is to have .nix-defexpr be a link itself to my ~/Code/nixpkgs directory. Otherwise, my attribute paths will need some kind of prefix, and since I only want to use expressions under ~/Code/nixpkgs, using this unnecessary prefix will get a little annoying. Normally, we could simply make .nix-defexpr a link to the right directory, but it turns out that if .nix-defexpr is a link, it is deleted when you log in and replaced with the Nix default. So, as a work around, I’m adding code to my .bashrc file to set up .nix-defexpr the way I want when I open the terminal.

We also should change the NIX_PATH environment variable similarly to what I have done below.

#!bash
# In ~/.bashrc
rm -r ~/.nix-defexpr
ln -s /home/dan/Code/nixpkgs ~/.nix-defexpr

# Then export the right env variables:
export NIX_PATH=/home/dan/Code:nixos-config=/etc/nixos/configuration.nix;
nix-search(){ echo "Searching..."; nix-env -qaP --description \* | grep -i "$1"; }

We can make installing easier too by writing a new command to run expressions from our git repo, specified by attribute path.

#!bash
nix-install(){ nix-env -iA $1; }

The first version of this post used the -f flag exclusively because I didn’t yet know about NIX_PATH and .nix-defexpr. Having a nix-install helper function makes more sense when the -f flag was being used, but in its current form it doesn’t save any keystrokes. The user may use her discretion when deciding whether or not to use nix-install.

Put both functions into the .bashrc file in your home directory, then use source ~/.bashrc to reload the .bashrc file for the updates to take effect.  We can use the new commands like this (might need to scroll right!):

#!bash
[dan@nixos:~]$ nix-search vim
Searching...
bvi                                                                 bvi-1.3.2                                                                     Hex editor with vim style keybindings
qvim                                                                qvim-7.4                                                                      The most popular clone of the VI editor (Qt GUI fork)
vim                                                                 vim-7.4.316                                                                   The most popular clone of the VI editor
vimWrapper                                                          vim-with-vimrc-7.4.316                                                        The most popular clone of the VI editor
vimb                                                                vimb-2.4                                                                      A Vim-like browser
vimbWrapper                                                         vimb-with-plugins-2.4                                                         A Vim-like browser (with plugins: )
vimprobable2                                                        vimprobable2-1.4.2                                                            Vimprobable is a web browser that behaves like the Vimperator plugin available for Mozilla Firefox 
vimprobable2Wrapper                                                 vimprobable2-with-plugins-1.4.2                                               Vimprobable is a web browser that behaves like the Vimperator plugin available for Mozilla Firefox  (with plugins: )
vimNox                                                              vim_configurable-7.4.316                                                      The most popular clone of the VI editor
vimHugeX                                                            vim_configurable-7.4.316                                                      The most popular clone of the VI editor
vimHugeXWrapper                                                     vim_configurable-with-vimrc-7.4.316                                           The most popular clone of the VI editor

[dan@nixos:~]$ nix-install vim
replacing old `vim-7.4.316'
installing `vim-7.4.316'

An Aside About Nix Search Paths

I have had to update this post a few times as I learn more about how Nix search paths work. I have tried to keep everything mentioned here correct and consistent, but having everything clearly spelled out is valuable. Here’s my most up-to-date knowledge:

  • By default, the nix-env command searches the expressions contained in the ~/.nix-defexpr directory. This directory can have subfolders or symbolic links to any other directories, and Nix will prepend any attributes with the symbolic link name. For instance, if .nix-defexpr contained a link dans_nixpkgs -> ~/Code/nixpkgs, then searches using nix-env will show attributes as dans_nixpkgs.haskellPackages.snap, for instance.
  • By making .nix-defexpr a symbolic link itself, you can eliminate the prefixes, but .nix-defexpr will be reset back to the default the next time you boot the machine. As a work around, I have placed code in my .bashrc file to set it up the way I want each time a terminal is opened.
  • The .nix-defexpr default location is what is overridden when using the -f flag.
  • The NIX_PATH environment variable is used when resolving <brackets> in nix expressions. For example, NIX_PATH=/home/dan/Code will lead to <nixpkgs> resolving to /home/dan/Code/nixpkgs. It has no effect on the nix-env command itself.
  • nixos-config must point to the configuration.nix file or else nixos-rebuild calls will fail.

Installing Haskell Platform and GHC

We can use our new bash commands to start installing our required Haskell packages.  In the past, I have tried to avoid Haskell Platform because, invariably, I would need a different version of one of the packages it offers or I would need a package that isn’t included.  Unfortunately, following either of these scenarios has sometimes required that I re-install all my packages from scratch to resolve odd dependency conflicts. But, this is NixOS, and the claim is that NixOS is designed to prevent that kind of baloney from happening.  Only time and experience will tell if that’s true, but in the meantime we’ll barge right ahead and get Haskell Platform since it is often suggested as the best way to get started with Haskell.

#!bash
[dan@nixos:~]$ nix-search "haskell platform"
Searching...
&lt;omitted&gt;
haskellPlatform                                                     haskell-platform-2013.2.0.0                                                   Haskell Platform meta package
[dan@nixos:~]$ nix-install haskellPlatform 

After installation is complete, we will have Haskell Platform 2013.2.0.0 installed, which used ghc 7.6.3 to build.   However, we did not yet install ghc because NixOS only puts packages we install on the path, not their dependencies. Installing ghc is now a fast operation because all NixOS is doing is adding the existing executable to the path. At the same time, let’s install cabal.

#!bash
nix-install haskellPackages.ghc
nix-install haskellPackages.cabalInstall

I have received reports from some users that haskellPackages.ghc doesn’t work for them, but haskellPlatform.ghc does, so give that a try if the above doesn’t work for you.


That’s it for this installment.  Check back soon for the next *exciting *post in this series, although I’m not yet sure what it will be.

Installing NixOS

This entry is part 2 of 6 in the series Setting Up Haskell Development on NixOS Linux from Scratch

In the last post of this series, we set up a VM to run NixOS using VirtualBox.  Now we actually need to go ahead and install NixOS.  We’ll be installing it into our VM, but if you are installing it into an actual machine, most of the instructions here will work for you.

This post is based on this article on the NixOS wiki, but there are some differences because I chose to configure NixOS differently.

Installing NixOS

  1. Go to the NixOS download page and download a release of NixOS.  At the time of this writing, the newest release is 14.04, and I chose the Graphical Live CD, 64-bit Intel/AMD version, which is recommended for most users.
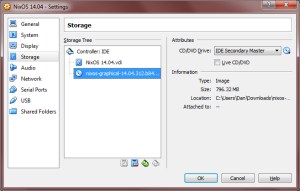
  2. Open up the VirtualBox VM Manager and select your NixOS VM.  Then choose Settings > Storage.  Click the CD icon in the storage tree.  Then, on the right side under Attributes, click the CD icon to choose a virtual CD/DVD file.  Select the nixos ISO file you downloaded in step 1.NixOS Boot
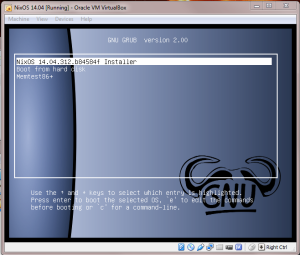
  3. Click OK, then start.  You should see the following menu.  Choose the first option, NixOS installer.  It is chosen for you automatically after about 10 seconds.GRUB Installer
  4. After the NixOS installer boots up, you’ll be at a terminal login prompt that tells you to login as root.  Enter root for your login name and hit enter.
  5. So far, we haven’t actually installed anything.  Before we can do that, we need to initialize the file system on our virtual machine so it can read and write files to our virtual disk we set up in the previous post.  The first thing to do is create a partition on our virtual disk.  Type
    fdisk /dev/sda

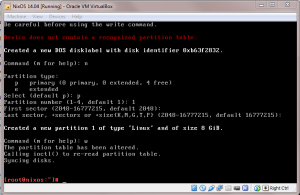
    to run the disk partitioning program, which has a simple but completely non-intuitive interface.  The commands I entered, in order, are n (for new partition), p (for primary partition), 1 (assign partition number 1), no selection (defaults to 2048 for start of partition), and no selection (again, default).  Finally, I enter w to write the partition to disk.  See below.Parition Disk

  6. Next, we need to make a file system onto our new partition.  Enter
    mkfs.ext4 -j -L nixos /dev/sda1

    This command will make a new file system with the ext4 format into partition 1 of sda, enable journaling, and give our new filesystem the label nixos.

  7. Now that we created the filesystem, we need to mount it.  Mounting it is like connecting different filesystems together, but in this case we need to connect our filesystem to the OS.  Mount the filesystem with
    mount LABEL=nixos /mnt

That’s the last step in setting up the disk and file system.  Next, we’ll configure NixOS itself.

Configuring NixOS

If you just want to get NixOS set up as fast as possible, skip to the instructions below.  Before I get to that, however, I’ll briefly describe the Nix philosophy and implementation from a few different levels.  These are just my impressions and understanding from using NixOS for a few days, but I have found this information to be crucial in order to do anything useful.

NixOS is a Linux distribution built around the Nix package manager, which is available for installation on other OSes if you want, but is the only package manager for NixOS.  Every piece of software installed on the entire system is installed through Nix.

So what makes Nix useful?  In most other package managers, new versions of software replace older versions.  If some component of the system depends on that software but is incompatible with the new version, then it will break after the upgrade.  Extend this problem to the huge graph of intermingling dependencies among all the software on a user’s computer and you get what’s called dependency hell.  Other Linux distributions try to prevent dependency hell by keeping official lists of software packages that are expected to be compatible, installing packages from this list, and occasionally updating the list with new versions.

Nix, on the other hand, installs new version of software side-by-side with their older versions, and older versions are deleted only when they are no longer required.  Nix achieves this through a combination of two mechanisms: a sophisticated system of sym links that keeps track of which version of packages are “active” at any time and a build system that exhaustively describes every input into each individual package.

The second part is the part we need to understand for our next steps.  Installing new software requires writing a Nix expression that completely describes all the prerequisites and dependencies for the software to be installed.  These dependencies can themselves be Nix expressions defined elsewhere.  When we install new packages, what we are doing is running a Nix expression for that package.  Nix first recursively ensures all build dependencies are available, either by checking that they are already built or by running Nix expressions to build them.  Then, it builds and installs our new package.

This is exactly the process we’ll use to install NixOS itself.

  1. First, we need an expression that will define the components we want to build and install.  We can make one and configure it using
    nixos-generate-config --root /mnt 
    nano /mnt/etc/nixos/configuration.nix

    This will open the configuration.nix expression in the nano editor.

  2. The configuration looks something like the one below.  Use the arrow keys to navigate through the file.  Lines marked with a # are comments, and several important configuration lines are commented out by default.  Use nano to move the cursor around and delete the # to enable the features you want.  In the picture, I have deleted the #s for boot.loader.grub, networking.hostName, and networking.wireless.enable.  I also uncommented all the lines that begin with services.xserver to enable a GUI.  I also uncommented the lines at the bottom of the file that add a new user and modified them as shown.  When you are done, use Ctrl-O to save the changes and Ctrl-X to exit.Nix configNix User Config
  3. With the configuration.nix nix expression defined, we are ready to install NixOS! Run
    nixos-install

    to start the installation.  If there is a problem with the filesystem and the installation refuses to start, you can redo the steps starting with the fdisk step, but use d (for delete) as the first command to delete the primary partition and start fresh.

  4. After installation completes, shut down the virtual machine, and in the VirtualBox Manager go to Settings > Storage, click on the CD on the right hand side and choose “Remove disc from virtual drive.”  This removes the NixOS installer from the boot menu so we don’t boot into it by default.  Then start the VM again.
  5. When the VM boots up, you should see a graphical login window.  We can’t log in yet because we need to change some passwords first.  To do this, we need to use the command line again.  Access the console login using the Power drop down menu.Console Login
  6. Log in as root, which still has no password.  We will change that right now with
    passwd

    Enter a new root password for your system.  If you created any users, you can set their passwords also with, for example,

    passwd dan
  7. reboot one final time and verify you can log in successfully.

That’s it! whew Next in the series, we’ll tackle how to install essential software.