Installing VirtualBox (for NixOS)

This entry is part 1 of 6 in the series Setting Up Haskell Development on NixOS Linux from Scratch

Welcome to the first installment of my series about setting up Haskell development on NixOS Linux from scratch!

I consider myself somewhere in the beginning-intermediate stages of Haskell skill, having created a useful application for Windows as learning exercise.  However, to really take my Haskell skill to the next level, I needed to migrate to the de facto standard Haskell environment – Linux.  Ollie Charles, a Haskell reddit member who writes the wonderful 24 Days of Hackage tutorial series on his site, has adopted NixOS as his Linux distro of choice and wrote a blog post describing how to get started.  I decided to trust his choice and try it out for myself.

As I dove deeper into the rabbit hole of getting my environment set up properly, I found myself getting frustrated with having to search all over the net for tutorials, walkthroughs, and installation help just to get everything set up.  Indeed, Ollie’s post does a good job giving the flavor of Haskell development on NixOS, but it’s not comprehensive enough to provide the whole story.  The goal of this series is to provide that whole story as I discover it myself.  If something in these posts is unclear or flat out wrong, please let me know!

Ok, with the introduction out of the way, let’s jump right in.

Installing VirtualBox

VirtualBox is a free program from Oracle that allows you to run a virtual machine on a host computer.  In this case, we’ll use a virtual machine to run NixOS and host the VM on Windows.

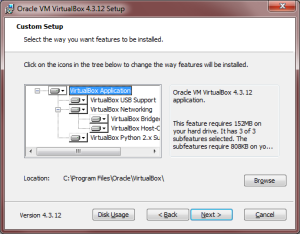
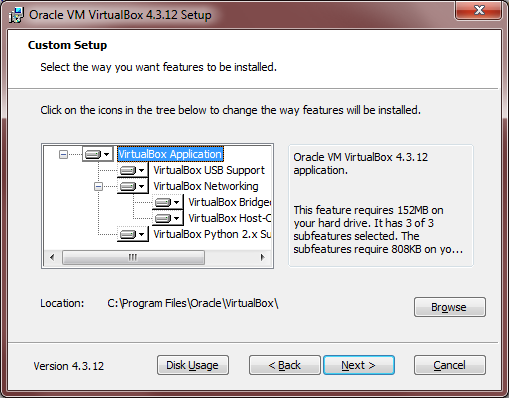
  1. Download VirtualBox installer from here.  At the time of this writing, the latest version is 4.3.12.  Since we are hosting the VM on a Windows computer, we want VirtualBox 4.3.12 for Windows hosts.
  2. Run the installer.  You’ll see something like the screen below.  I accepted all the defaults except I don’t like shortcuts on my desktop, so I disabled that (on the next screen).  Also, I got a warning that I would be temporarily disconnected from my network as part of the installation process.Virtual Box Installer
  3. Wait for installation to complete.  If you are prompted to install devices, go ahead and install them.  Installation took 10-20 seconds for me.

Create a virtual machine to run NixOS

Now that we have VirtualBox installed, we need to create a virtual machine that will run our NixOS distribution.

  1. Start your newly installed VirtualBox software.  When you start it up, you’ll be at the VirtualBox Manager window.  From this window, you can create and manage multiple virtual machines that all run inside the host computer.  We only need to create one, though.  Click the blue New button.
  2. Now we’re at the Create Virtual Machine Wizard, which looks something like the window below.  Your selections will be similar to mine but might need to be different based on your computer architecture.  I have a 64 bit machine, so I chose Other Linux (64-bit).  You can also use whatever Name you like.  I happen to know I will be using NixOS 14.04.Create VM
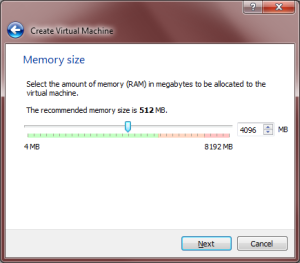
  3. Next you will choose the amount of RAM for the VM.  This is the amount of RAM your VM reserves for its own use while you are running it.  My machine has 8 GB total, so I allocated 4 GB (4096 MB) to my VM because I never plan to run it at the same time as another RAM-hungry process.VM Ram Size
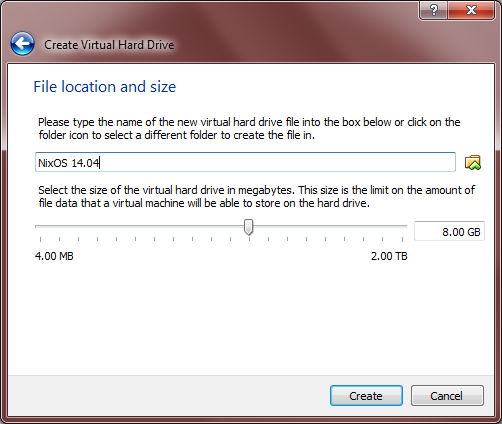
  4. At the next screen, you are prompted to create a virtual hard drive.  Choose to create a new drive now and choose the VDI format on the next screen.  After that, choose “Dynamically Allocated,” which allows your VM to take up hard drive space as it needs it instead of reserving it all up front.  Lastly, choose the size of your new virtual drive.  The default setting for me is 8 GB, which sounds sufficient for small development box.  Besides, if we run low on space, we can increase the size later.VM Hard Drive Size
  5. After that, your VM is created!  You can now click on the orange Settings gear to explore different ways to configure your VM.  I plan to run with the defaults until I decide I need more processing power or otherwise need to change the settings. The only thing I changed was under General ? Advanced where I changed Shared Clipboard and Drag’n’Drop to both be bidirectional.

And that’s it! Don’t bother starting the VM yet, though.  There’s no point until we install the NixOS operating system onto it.  We’ll cover that in Part 2.


FNIStash r1.4 released!

It’s been a long while, but a new version of FNIStash is available. r1.4 adds only one feature, but it will be really useful for some people. In this release, you can optionally configure where the fnistash.db file is located on your system. You can even point it to a network drive! Now you and a friend can share the same FNIStash database, but be careful: only one of you should run FNIStash at a time.

This release is a change I made for a user request quite some time ago but never got around to releasing. It has worked for her without any problem that I know of.

So I looked at the download logs for FNIStash releases, and there are now several hundred users!  Not bad.

The last 6 months has been a tumultuous time for me.  My wife got a new job, I left my old job and got a new one, and I moved to the Seattle area.  The process has been MUCH longer than I would have liked or anticipated, but today officially marks the end of it because my wife is finally joining me in Washington.

FNIStash r1.3 released!

It’s been a pretty wild 1-2 months since I released 1.0 of FNIStash, both for me personally and for the program itself.  I’m glad that it has been very warmly received and that so many people are giving me good feedback.  It has gone through a few subsequent releases to fix bugs and add new features, the biggest probably being the ability to delete items from the Registry.  It has been downloaded over 150 times, which is pretty good I think considering I don’t publicize it much.

Other things in my life include developing a website with my brother (which, sadly, we lost our momentum on, but I hope we can get it back in the future), illness, my mother-in-law returning to China after a bureaucratic nightmare, and a shakeup at work.  So my attention to this blog has waned, but I expect this kind of transitional period in my life to get wrapped up in short order.

FNIStash r1.0 released!

It’s been a long time coming, but I have made the first release of FNIStash!  I consider this release experimental until all the bugs are worked out.  So far I have already received some good feedback and a couple of bug/compatibility reports.  Follow the links below for more.

FNIStash homepage, with video tutorial

Announcement of FNIStash on Runic Games Forum

Announcement of FNIStash on r/Torchlight subreddit

It was a long, educational experience writing this program.  I think I got a good feel for Haskell and hope my next project with the language focuses more on good habits and style instead of focusing almost solely on making a functional product.  I’d like to eventually write up a post-mortem of my experience of building a non-trivial application in Haskell as a 100% FP and Haskell newb, so look for that in the future if you’re interested.

FNIStash nearing completion

I’ve been able to get some decent time working on FNIStash lately, and have made some really good strides.  It’s nearing feature completion, as least as far as the major features I have in mind are concerned.  Preliminary testing between my wonderful fiancee and myself will hopefully root out any sneaky bugs or deficiencies.  Here’s what it looks like now.

Final look of FNIStash? Perhaps.

Final look of FNIStash? Perhaps.

Managing Items

When FNIStash reads the shared stash file, it registers all items it finds in a database.  The new Registry table shows the status of all registered items.  If the item is Stashed, then it is currently in the shared stash file.  Other statuses are Inserted (inserted into an item) and Archived (existing in the database only).  Another status I want to add is Lost or something along those lines, which would describe items that used to be Stashed but somehow left the stash, such as when they get traded away or put on a character.

The Registry table also serves as the drop target for moving items from the Stash to the Archive.  Drag and drop an item to the table, and the item disappears from the stash and its status becomes Archived.  Once archived, the appropriate row text in the table changes color to black, and the row’s icon becomes draggable to allow the user to drag the item from the Archive to insert it back into the stash.  For convenience, the yellow arrow button will automatically archive all items in the stash.

The UI mechanics here are quite close to what I imagined when I started this project.  I’m really happy that threepenny-gui, the Haskell GUI library I’ve been helping to test and sometimes develop, has been able to keep up.

Finding Items

The Filter field at the top of the UI allows the user to find items by key phrase(s).  Stashed items not matching the phrase become faded, and any row of the Registry table whose item doesn’t match the phrase is also hidden.

The keyword filter allows easy searching of items.

The keyword filter allows easy searching of items.

Capturing the Grail

One of the key achievements in any hack and slash game is achievement of the grail – finding at least one of each item in the entire game.  Normally, the limited stash capacity of these games makes searching for the grail really inconvenient, sometimes prohibitively.  FNIStash helps grail searchers by automatically keeping track of how much of the grail has been registered in the database, as well as which items still need to be found and how rare they are.  I still have some work to do to properly exclude items that are in the game’s files but not actually obtainable, but the basic report format is shown below.

Early version of FNIStash grail report.

Early version of FNIStash grail report.

What’s Next

With a little luck, I’ll be able to start testing in earnest in the next few weeks!  One thing I’m concerned about is how TPG and the database will hold up when the number of registered items gets into the several thousands.

Item display in FNIStash

I’ve spent the last week or so digging down into the Torchlight 2 data files and enhancing the item display popup for FNIStash.  Now it’s a quite acceptable emulation of the item popup found in the game, although for some items there are still some quirks.

Item popup for FNIStash.

Item popup for FNIStash.

FNIStash gets a facelift

Over the weekend I gave FNIStash a facelift to make it moderately more attractive.  I’m pleased with the results!

You can see in the message box that some items are failing their parsing. Specifically, these are items that are sockets with gems or have augmentation abilities on them.  Fixing those guys is my next task, and I’ve already made some strides in decoding the binary format for this information.

FNIStash GUI revamp


Improving memory performance in Haskell programs

I ran into a big problem recently in FNIStash – I realized that it was using way more memory than I thought it should.  What followed was a couple weeks of arduous investigation and learning about Haskell.  If you find your program has a memory leak that is not due to thunks, these tips might help you out.  Note that this all applies to the de facto standard compiler, GHC.

Understanding memory usage

The first step to figuring out why your program is using a lot of memory is to measure it.  You can enable profiling by compiling your program with the -prof and -rtsopts compilation flags.  This enables profiling and allows you to control it from the RTS options passed from the command line when you run the program.  For example,

MyProgram.exe +RTS -hy

will run the program and categorize memory usage by type.  There are lots of categorization options available, such as by module or function.

When your program terminates, you’ll get a .hp file in the same directory as the executable.  You can convert it to a viewable PS or PDF file using

hp2ps -e8in -c MyProgram.hp 
ps2pdf MyProgram.ps

The result is something like this.

Memory profile of FNIStash categorize by type.

Memory profile of FNIStash categorize by type.

Here we can see that most of the memory is used up by ARR_WORDS, which is a backing type for ByteString and Text, among other things.  Since FNIStash reads and parses an archive of binary files, this makes sense.  However, the magnitude of the plot maxes out at around 25 MB.  Why, then, does Windows report over 70 MB of memory used?

Memory footprint of FNIStash

The discrepancy is due a couple of factors:

  1. First, the profiling doesn’t come for free.  Compiling with the -prof option necessitates more memory just for reporting purposes.  This requires approximately 30% more memory than usual.  This overhead isn’t reported on the plot, but the OS sees it.
  2. The reported memory usage is only “live memory.”  It doesn’t include old data that has not been collected by the garbage collector yet.  In fact, in very loose terms, the default GHC GC waits until live data grows to the size of old data before collecting it.  This means your program might use twice as much memory as needed.  Note that when the garbage collector does run, it temporarily needs more space to reorganize the live data, so if a large amount of data is being collected at once, you can see memory usage (as reported by the OS) spike up.
  3. FNIStash, in particular, has some kind of memory leak.  Right after start up, the OS memory usage was around 66 MB, but crept up to 70 MB after some minor GUI interaction.  It’s actually unclear to me whether the leaked memory is reported in the plot.

So if we discount the leaked memory, then we have 66 MB / 1.3 / 2 = 25 MB, which is right in line with what the graph reports.  Turning off profiling saves an easy 30% of OS memory usage, but what if you want to save more?  How can the memory leak be fixed?  Are you stuck with using twice as much memory as necessary?

Fixing the leak

Fixing the memory leak was a Sisyphean process of changing data types, adding strictness, and other futile efforts until I found the magic bullet: the threaded run time system.  By default, Haskell uses a single-threaded RTS (meaning 1 OS thread) that can nonetheless provide concurrency.  Indeed, FNIStash uses multiple threads to run the frontend and backend separately.  The -threaded flag enables the multi-threaded RTS (multiple OS threads), and using it completely obliterated the terrible memory creep I was seeing in the Task Manager.  I don’t know why this is.  My suspicion is that the idle-time GC that comes with -threaded more aggressively cleans up.  Given the number of cores on modern machines, I plan to make this my standard in the future.

Tuning the garbage collector

GHC enables the user to tune the garbage collector from the command line using RTS arguments.  Here are the ones that I tested out.  To use them, your program must be compiled with the -rtsopts flag.  Additionally, and this is totally anecdotal on my part, it seems that having -prof enabled at the same time prevents any of these options from having an effect, so if you notice this you might want to compile without -prof.

  • -c : This option changes the GC algorithm to use a slower compacting strategy instead of a copying strategy.  What I think this mean is that instead of copying bytes around the heap when running GC, data gets compacted near where it already is.  The end result is less heap usage.  In my case, using this option yielded savings of around 10%.
  • -Ffactor : Here “factor” is a value.  By default, GHC uses a value of 2.  This is the growth factor allowed before GC is run.  If you make this smaller, GC will be run more often.  However, this didn’t seem to help me out much.
  • -Gx : If x = 1, this enables the single generation collector.  I used this option without any others, and it actually increased my memory usage considerably and made my program much slower.  I also tried G3, but that used a lot more memory as well.

In the end, I decided that killing the leak with the threaded RTS was enough for me.  I don’t need extra memory savings by using -c for the moment.  So I went from 70+ MB with a leak down to 48 MB with no leak by using -threaded and removing -prof.  The real benefit, however, was learning more about GHC’s runtime system.

Item filtering in FNIStash

Here’s a brief update on the progress of FNIStash.

So something I had wondered about for a while has come to fruition: clockworkcore.org has already released an “infinite stash” program for Torchlight 2 called Stash Ninja.  I learned about it a few weeks ago.  This is hardly surprising to me, but I did wish that I would be the first.  They released the first complete character editor and some other utilities, and their results are usually quite good.  In fact, before I started FNIStash, I waited (and even emailed asking for an update) for CC to release the file specification under its Information section.  At the time it said “Hopefully by the end of October,” which it still says today.  I got tired of waiting for the file spec to come out, so I started to decode it myself, which was a long and tedious process.  I’m pretty proud of all that I’ve accomplished on my own, but I have to admit that it looks like Chthon knows a little more about it than I do.

I still think my version (and the features I have planned for it) will have a lot to offer beyond what Stash Ninja does, if I ever get around to finishing it.

Here’s one such feature: searching based on item keywords, including stats, level requirements, etc.  See it below, although the presentation needs a lot of cleanup.  I’ve used sqlite to make an item registry database, and it has enough foreign keys to reuse data that it should be pretty scalable to many, many items.  Enter in a few keywords, and the stash display is filtered to only show the items matching the query.

Image of filtering in action

These three items are the only ones in the shared stash matching both keywords "poison" and "electric"

FNIStash GUI progress

I pick at FNIStash off and on when I get a chance.  Here’s what it looks like now.  Each of the three tabs on the bottom is selectable to switch between the classes of items, and each item is individually drag and droppable.  When you roll over an individual item, a description box pops up showing information about that item.  There are still some things I need to put into the description box, but right now it works nicely as a proof of concept.  What I want to eventually do is put the description box on the cursor like the game does.

Progress pic for FNIStash GUI