Welcome to the first installment of my series about setting up Haskell development on NixOS Linux from scratch!
I consider myself somewhere in the beginning-intermediate stages of Haskell skill, having created a useful application for Windows as learning exercise. However, to really take my Haskell skill to the next level, I needed to migrate to the de facto standard Haskell environment – Linux. Ollie Charles, a Haskell reddit member who writes the wonderful 24 Days of Hackage tutorial series on his site, has adopted NixOS as his Linux distro of choice and wrote a blog post describing how to get started. I decided to trust his choice and try it out for myself.
As I dove deeper into the rabbit hole of getting my environment set up properly, I found myself getting frustrated with having to search all over the net for tutorials, walkthroughs, and installation help just to get everything set up. Indeed, Ollie’s post does a good job giving the flavor of Haskell development on NixOS, but it’s not comprehensive enough to provide the whole story. The goal of this series is to provide that whole story as I discover it myself. If something in these posts is unclear or flat out wrong, please let me know!
Ok, with the introduction out of the way, let’s jump right in.
Installing VirtualBox
VirtualBox is a free program from Oracle that allows you to run a virtual machine on a host computer. In this case, we’ll use a virtual machine to run NixOS and host the VM on Windows.
- Download VirtualBox installer from here. At the time of this writing, the latest version is 4.3.12. Since we are hosting the VM on a Windows computer, we want VirtualBox 4.3.12 for Windows hosts.
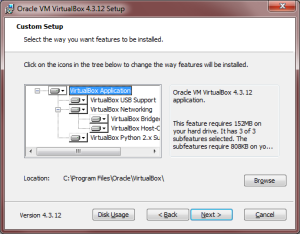
- Run the installer. You’ll see something like the screen below. I accepted all the defaults except I don’t like shortcuts on my desktop, so I disabled that (on the next screen). Also, I got a warning that I would be temporarily disconnected from my network as part of the installation process.

- Wait for installation to complete. If you are prompted to install devices, go ahead and install them. Installation took 10-20 seconds for me.
Create a virtual machine to run NixOS
Now that we have VirtualBox installed, we need to create a virtual machine that will run our NixOS distribution.
- Start your newly installed VirtualBox software. When you start it up, you’ll be at the VirtualBox Manager window. From this window, you can create and manage multiple virtual machines that all run inside the host computer. We only need to create one, though. Click the blue New button.
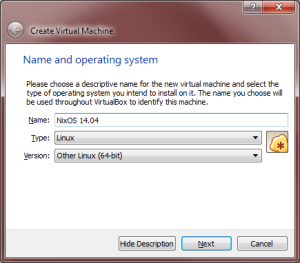
- Now we’re at the Create Virtual Machine Wizard, which looks something like the window below. Your selections will be similar to mine but might need to be different based on your computer architecture. I have a 64 bit machine, so I chose Other Linux (64-bit). You can also use whatever Name you like. I happen to know I will be using NixOS 14.04.

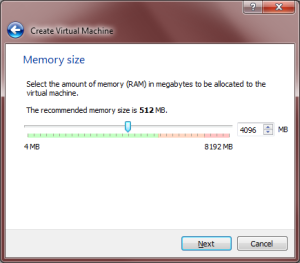
- Next you will choose the amount of RAM for the VM. This is the amount of RAM your VM reserves for its own use while you are running it. My machine has 8 GB total, so I allocated 4 GB (4096 MB) to my VM because I never plan to run it at the same time as another RAM-hungry process.

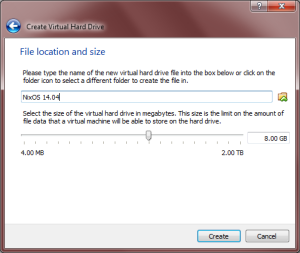
- At the next screen, you are prompted to create a virtual hard drive. Choose to create a new drive now and choose the VDI format on the next screen. After that, choose “Dynamically Allocated,” which allows your VM to take up hard drive space as it needs it instead of reserving it all up front. Lastly, choose the size of your new virtual drive. The default setting for me is 8 GB, which sounds sufficient for small development box. Besides, if we run low on space, we can increase the size later.

- After that, your VM is created! You can now click on the orange Settings gear to explore different ways to configure your VM. I plan to run with the defaults until I decide I need more processing power or otherwise need to change the settings. The only thing I changed was under General ? Advanced where I changed Shared Clipboard and Drag’n’Drop to both be bidirectional.
And that’s it! Don’t bother starting the VM yet, though. There’s no point until we install the NixOS operating system onto it. We’ll cover that in Part 2.
The link “Setting Up Haskell Development on NixOS Linux from Scratch” https://fluffynukeit.com/series/haskell-nixos/ seems broken.
Thanks for the heads up. I’m not sure why it wasn’t working before, but I must have stumbled on a solution because it looks to be working now. Please let me know if the issue persists.